
Onboarding Guide: MDR, MSP and MSSP Partners

Introduction

Welcome! This guide is designed specifically for MDR, MSP, and MSSP partners deploying and managing Sublime across multiple client environments. Follow each phase in order for every new client deployment. Plan for 3 to 4 weeks from initial setup to full production.


Pre-foundation setup Before day 1

Before any configuration begins, you need to confirm the right access is in place and stand up the client's isolated environment in Sublime. These steps happen before any email data is touched. Getting them right upfront prevents auth issues and rework later.

Prerequisite These steps require a Global Admin or Super Admin for the customer's email tenant. Confirm this is in place before scheduling any kickoff call.
1 Create a sub-organization for the client
Goal: Establish an isolated environment for this client within your parent org

Steps

  1. Navigate to Admin > Child Orgs and create a new child org for this client
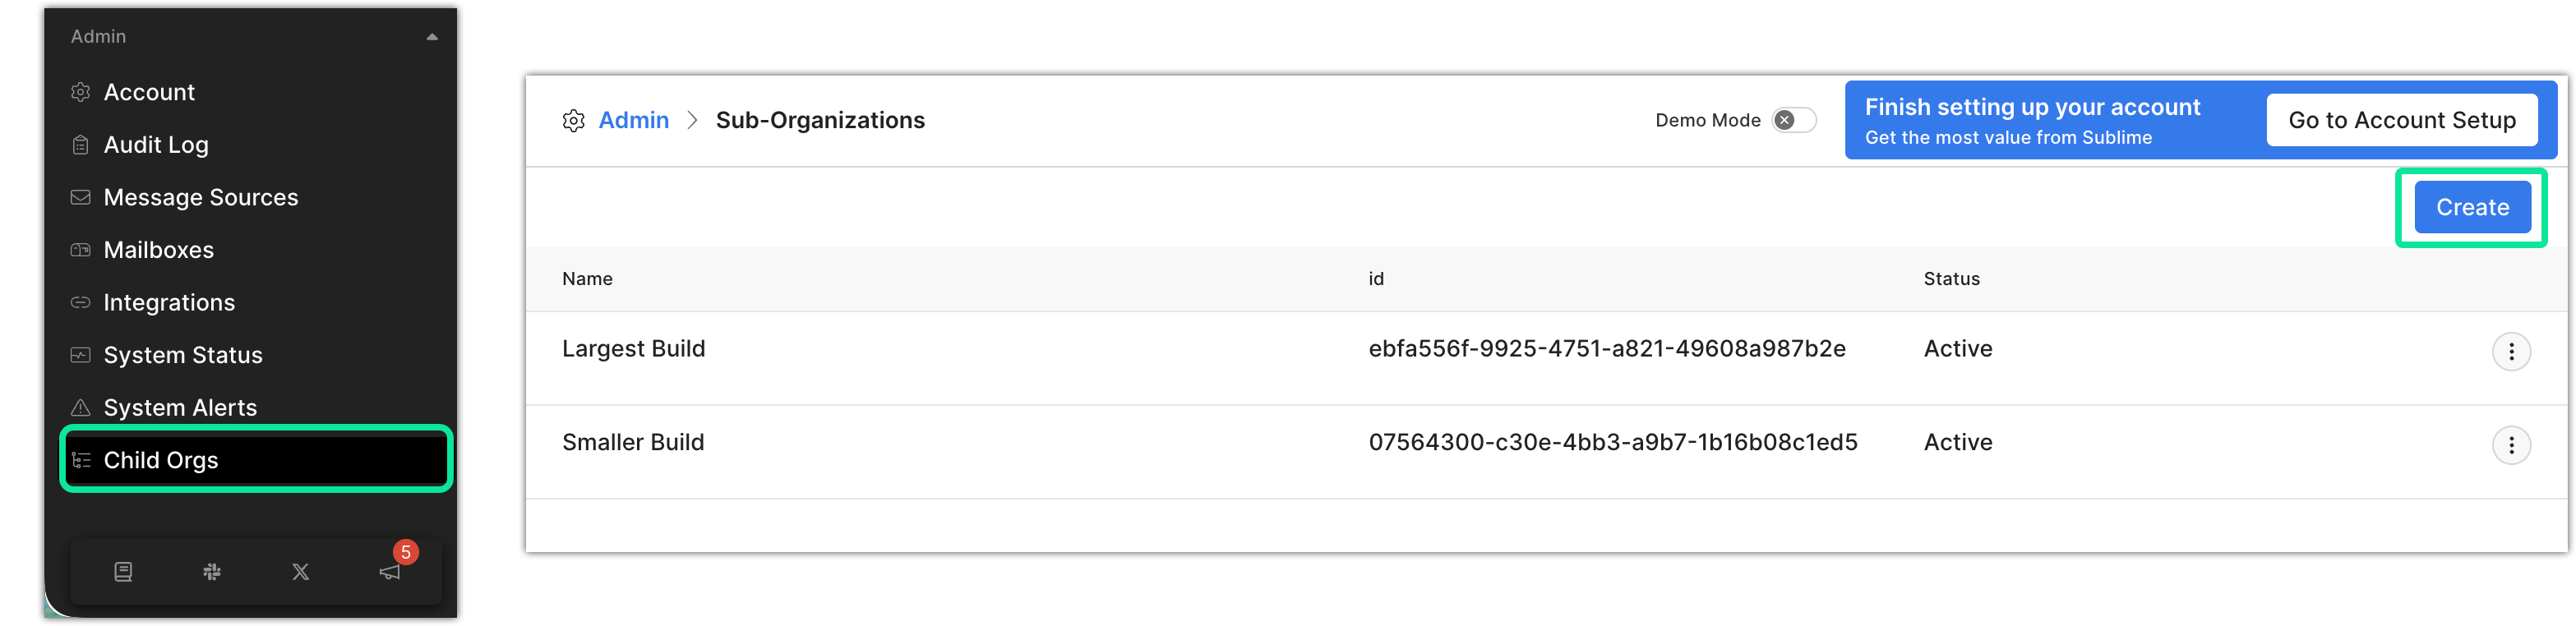
Creating a child org
Best practice Use a consistent naming convention across all client sub-orgs from day one. It saves significant time when managing dozens of environments.
2 Integration setup
Goal: Enable core detection capabilities from day one
Completion: LinkAnalysis and Whois enabled; all Core Feed rules installed

Steps

  1. Enable LinkAnalysis and Whois integrations (Admin > Integrations)
  2. Install all Core Feed rules: Follow the guided tour below.
Common pitfall Child orgs do not inherit settings from the parent org. Configure integrations independently in each child org, even if already enabled in the parent.
3 Configure phishing simulation exclusions (if applicable)
Goal: Prevent simulation emails from being flagged as threats before ingestion begins

Steps

  1. Navigate to Manage > Exclusions and activate the exclusion for your client's phishing simulation provider
Pre-built exclusions available Sublime ships with built-in Global Exclusions for KnowBe4, Cofense, Proofpoint Security Awareness, HoxHunt, Microsoft Defender Attack Simulation, NINJIO, and BullPhish. They are inactive by default - just activate the right one.
Why a global exclusion A Global Exclusion stops the message from being analyzed by any detection rules or automations at all. Without it, simulation emails get flagged, trigger auto-actions, and surface in the review queue as real threats, breaking the simulation entirely.
Pre-foundation task summary
  • Sub-organization created for this client
  • Integration setup complete (LinkAnalysis, Whois, Core Feed rules)
  • Phishing simulation exclusions configured (if applicable)
Phase 1: Foundation Days 1 to 3

With your customer authorized, this phase covers the full account configuration - connecting the message source, activating mailboxes, populating the VIP list, setting retention, and kicking off historical ingestion.

1 Account setup
Goal: Activate mailboxes, configure the VIP list, set retention, and kick off historical ingestion
Completion: All mailboxes active, VIP list populated, historical ingestion running

Steps

  1. The guided tour below walks through the complete flow (with M365 as the example).
Trial reminder Reach out to your Sublime partner rep before the 14-day trial ends to convert to a full license and avoid losing Enterprise functionality.
Synchronous alternative If you need to do this live with the customer, invite them as an Admin and walk through Admin > Message Sources > New message source together.
Phase 1 task summary
  • Message source connected and verified
  • All mailboxes activated
  • VIP list populated (if one exists)
  • Message retention configured to maximum duration
  • Historical ingestion initiated
Phase 2: Tuning & baseline Days 4 to 14

This is the most important phase and the one most often rushed. Historical ingestion surfaces everything Sublime would have flagged. Your job is to work through those results, label them, and create exclusions for known-good patterns before you enable live remediation. Plan to review results daily for 10 days. The quality of your Phase 3 depends directly on the work done here.

1 Review and label historical ingestion results
Goal: Tune detection accuracy and eliminate false positives
Completion: Results reviewed and labeled; exclusions created for known-good patterns

Steps

  1. Review and label Historical Ingestion results daily using this priority order:
    Priority What it is Your action
    1st: True positives Correct malicious verdicts on unremediated emails Investigate immediately for active incidents
    2nd: False positives Incorrect malicious verdicts on legitimate email Create exclusions for known-good patterns
    3rd: False negatives Malicious messages not flagged by any detection Share samples with Sublime to improve coverage
  2. Create exclusions for known-good patterns (click Exclude in the Message Group section)
  3. Share any false negatives with Sublime to improve core feed coverage
Tip Review daily during this window, not all at once at the end. Patterns emerge incrementally and you will catch environment-specific quirks much faster.
2 Configure the abuse mailbox
Goal: Enable user-reported phishing to feed into Sublime
Completion: Abuse mailbox integrated and confirmed

Steps

  1. Configure the abuse mailbox integration for user reports (Admin > Account > Abuse Mailbox)
Abuse mailbox warning The abuse mailbox is for phishing reports only. Do not set a general helpdesk email here. It floods Sublime with noise and degrades detection quality.
3 Microsoft 365 integration optimization
⊚ Microsoft 365 only
Goal: Maximize M365 integration depth for complete coverage
Completion: Safe Attachments applied; Report Phishing configured

Steps

  1. Apply the recommended Safe Attachments policy configuration
  2. Configure User Report ingestion from the native Microsoft "Report Phishing" button
Google Workspace If this client is on Google Workspace, skip this step. GW-specific configuration options are covered in the Google Workspace setup docs.
Phase 2 task summary
  • Historical ingestion results reviewed and labeled
  • Exclusions created for known-good patterns
  • Abuse mailbox configured
  • M365: Safe Attachments and Report Phishing configured (if applicable)
Phase 3: Production enablement Week 3+

With a clean baseline in place, you're ready to turn on live remediation. Start conservatively, connecting auto-actions to your highest-confidence automations first and expanding coverage as you validate results. By the end of this phase the environment should be running with minimal manual oversight.

1 Activate remediation actions
Goal: Enable automated threat remediation
Completion: Auto-remediation connected to appropriate rules and automations

Steps

  1. Connect Auto-Trash or Auto-Quarantine actions to your highest-confidence automations
  2. Start conservatively and expand remediation coverage as confidence builds
  3. Configure SOAR or webhook integrations if applicable (e.g., Tines)
What good looks like High-confidence detections should auto-remediate with minimal analyst involvement. Reference: Black Hills InfoSec achieves 97% automatic triage, with analysts reviewing only the remaining 3%.
2 Configure sustained management settings
Goal: Establish low-overhead, scalable operations
Completion: Auto-activation enabled; NOC/SOC alerting configured; trial converted

Steps

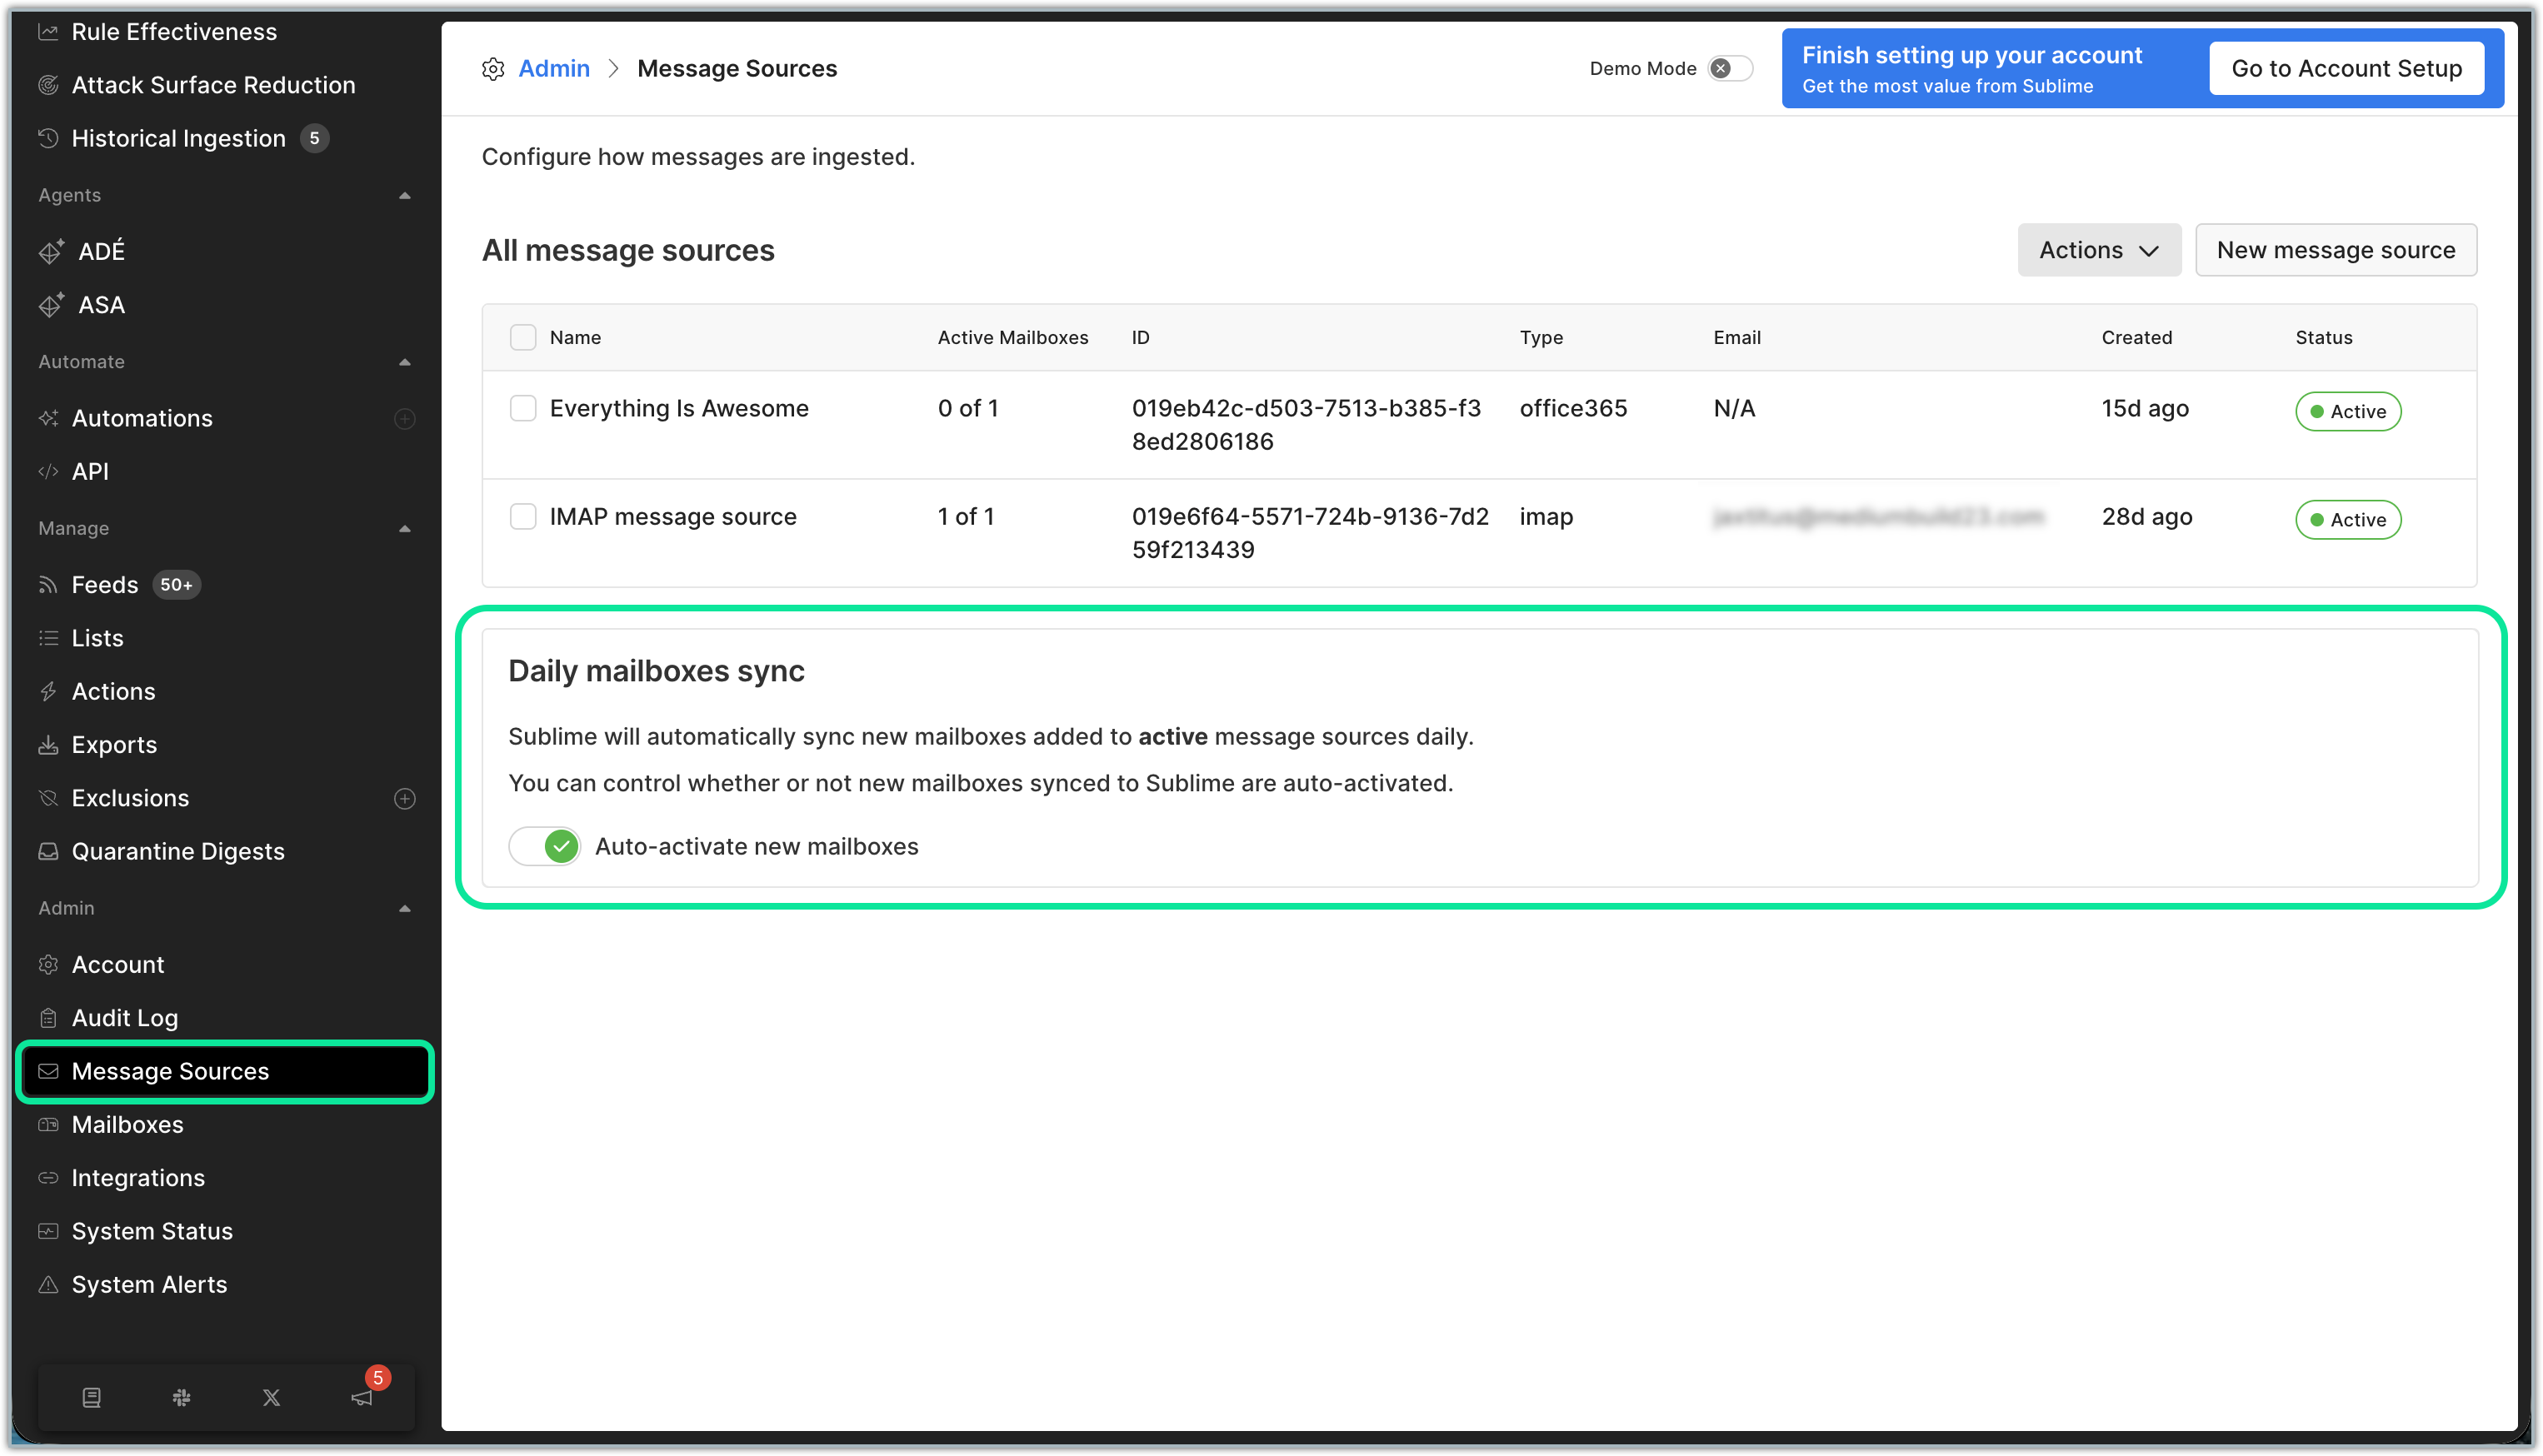
  1. Enable auto-activation of new mailboxes (Admin > Message Sources)
  2. Auto-activate mailboxes
  3. Configure alerting and reporting outputs for your NOC/SOC
  4. Contact your Sublime partner rep to convert the trial to a full license
Phase 3 task summary
  • Remediation actions connected to high-confidence automations
  • Auto-activation enabled for new mailboxes
  • NOC/SOC alerting configured
  • Trial converted to full license
Ongoing administration Everboarding

Once a client environment is fully operational, the focus shifts from setup to steady-state management. The cadences below keep detection quality high and give you the data you need for client reporting and QBRs.

CadenceActivities
Daily
  • Review flagged messages and message groups
  • Monitor high-confidence rule alerts
  • Address customer-reported FPs and FNs
  • Verify remediation actions executed successfully
Weekly
  • Review detection trends across client environments
  • Identify patterns needing new exclusions or adjustments
  • Check for new Core Feed rules
  • Monitor mailbox activation for newly added users
Monthly
  • Export protection metrics for client reporting (Overview page)
  • Review and update VIP lists
  • Assess remediation coverage and tune aggressiveness
  • Identify opportunities to expand rule coverage
QBR
  • Present attack trends and protection metrics
  • Review escalated incidents or notable threat campaigns
  • Discuss configuration optimization
  • Gather client feedback on detection accuracy
Optimization habit Regularly review and prune outdated exclusions. They accumulate silently and can degrade detection coverage without any obvious signal.
Best practices
Multi-client management
  • Use consistent naming conventions across all client sub-orgs
  • Document client-specific exclusions in a shared runbook
  • Establish standardized escalation procedures upfront
  • Template your deployment process to accelerate each new client
Reporting to clients
  • The Overview page shows key protection metrics; granular data is available via API
  • When sharing baseline results, combine high-level stats with specific threat examples
  • Establish a recurring review cadence (QBR or EBR) from the start, not as an afterthought
Scaling
  • Always start new clients in passive mode before enabling live remediation
  • Complete Historical Ingestion before enabling aggressive remediation
  • Enable auto-activation early so new mailboxes are never left unprotected
Support
  • Technical questions: your dedicated support channel or [email protected]
  • Partner account questions: your dedicated Sublime partner representative