Export Message MDMs
Overview
Sublime Enterprise users on Cloud and AWS CloudFormation deployments can configure all Message Data Models (MDMs) to export to an S3 bucket that you own every 10 minutes.
Note: Enterprise users on Docker deployments can request assistance with exports to S3 in your Sublime support Slack channel.
Setup
Before starting, you'll need to:
- Determine the ID of the AWS account uploads will be coming from (used for
AWS_ACCOUNT_IDplaceholder below):- If you've deployed into a self-managed AWS environment, then the Account ID will be that of the AWS account.
- Sublime Cloud:
- USA - Virginia (na-east), USA - Ohio (na-east-2), USA - Oregon (na-west), Canada - Montréal (ca), Australia (Sydney):
415365657389 - USA - Virginia (na-east-3), USA - Ohio (na-east-4), USA - Oregon (na-west-2), EU - Dublin (eu), UK - London (uk):
128225141972.
- USA - Virginia (na-east), USA - Ohio (na-east-2), USA - Oregon (na-west), Canada - Montréal (ca), Australia (Sydney):
- If you're unsure or the above cases don't apply, please contact Sublime support.
- Create an S3 bucket in the AWS account where you want the events exported to. We recommend creating a new S3 bucket specifically for these exports instead of re-using an existing one.
Configure bucket permissions
These instructions assume you have a bucket with default settings and bucket policies.
- Navigate to your desired bucket in the AWS S3 dashboard, and go to the Permissions tab.
- Click Edit on the
Block public access (bucket settings)section, which should bring you to the following page:
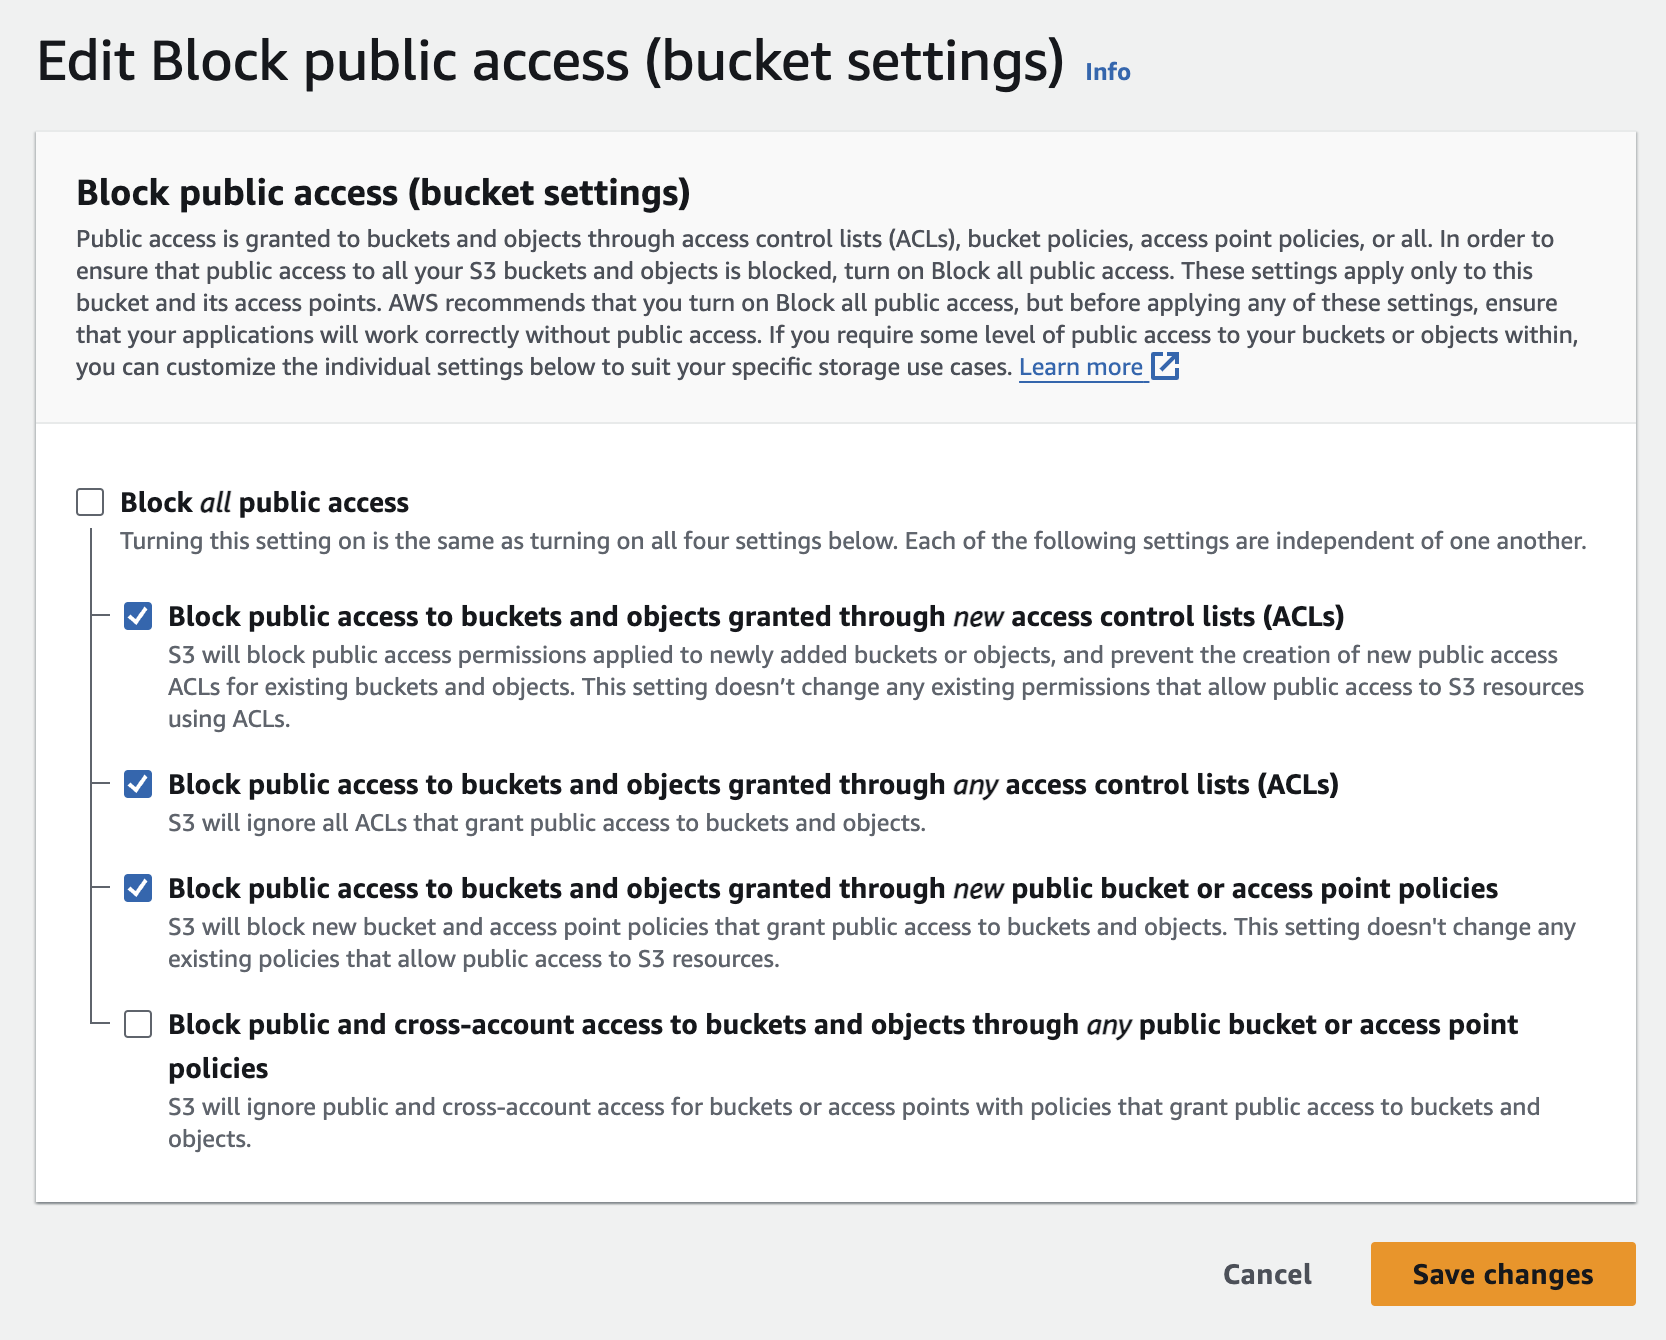
- Make sure the final checkbox is deselected. The other three should remain checked, unless you have a particular reason not to. Save these changes.
- Now, scroll down to the
Bucket policysection (still on the Permissions tab). This is where we'll set up the policy to allow cross-account uploads from the account Sublime is running in. Click Edit on theBucket Policytab. - Use the following template as the Policy. Update the placeholders
AWS_ACCOUNT_ID(use the ID from Setup step 1 -- the AWS account where exports are coming from) andBUCKET_NAME_HEREwith the corresponding values. Save changes once complete.
.{ "Version": "2012-10-17", "Statement": [ { "Sid": "AllowSublimeWrites", "Effect": "Allow", "Principal": { "AWS": "arn:aws:iam::AWS_ACCOUNT_ID:root" }, "Action": [ "s3:PutObject*" ], "Resource": [ "arn:aws:s3:::BUCKET_NAME_HERE/*" ] } ] } - The bucket is now configured for cross-account uploads from the Sublime platform.
Configure settings in Sublime
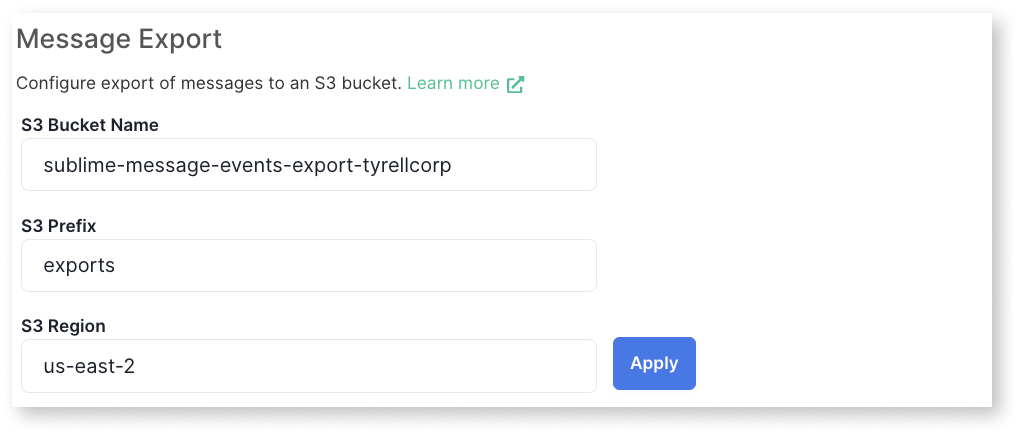
To complete configuration, head over to Account > Admin in your Sublime dashboard and scroll down to the Message Export setting. Configure the following fields:
- S3 bucket name: Bucket names must be globally unique. They can be named anything but here’s a sample format:
sublime-message-events-export-<your-organization-name> - S3 prefix (optional): Configuring a prefix will store your exports in a folder with the prefix name within the bucket. A prefix is not necessary if the bucket is not used for any other use cases (recommended).
Example prefix:exports - S3 region: the region you created the S3 bucket in
After hitting Apply, it may take up to 20 minutes before you start seeing events in S3. After the first export, exports take place every 10 minutes.
S3 Export Details
File Names
The filename (with prefixes) is output as follows:
ConfiguredKeyPrefix/YYYY/MM/DD/HH/mm/UnixTime_MessageGroupID_MessageID.json
Where each is as follows:
ConfiguredKeyPrefix: The key prefix that was configured in your Sublime Platform settings.
YYYY: Year
MM: Month, zero-padded
DD: Day, zero-padded
HH: Hour, zero-padded
mm: Minute, zero-padded
UnixTime: Time message was received in Unix Time (Number of seconds elapsed since 1/1/1970 UTC)
MessageGroupID: The ID of the message group that the message is in
MessageID: The ID of the specific message stored in the file
Content
The file is a JSON file that contains a top-level, single JSON object representing the MDM that was processed. The full MDM schema can be found here.
Updated 29 days ago