

Warning Banners
Overview
The Warning Banners Action is an Enterprise feature that allows you to surface a warning to mailbox users.
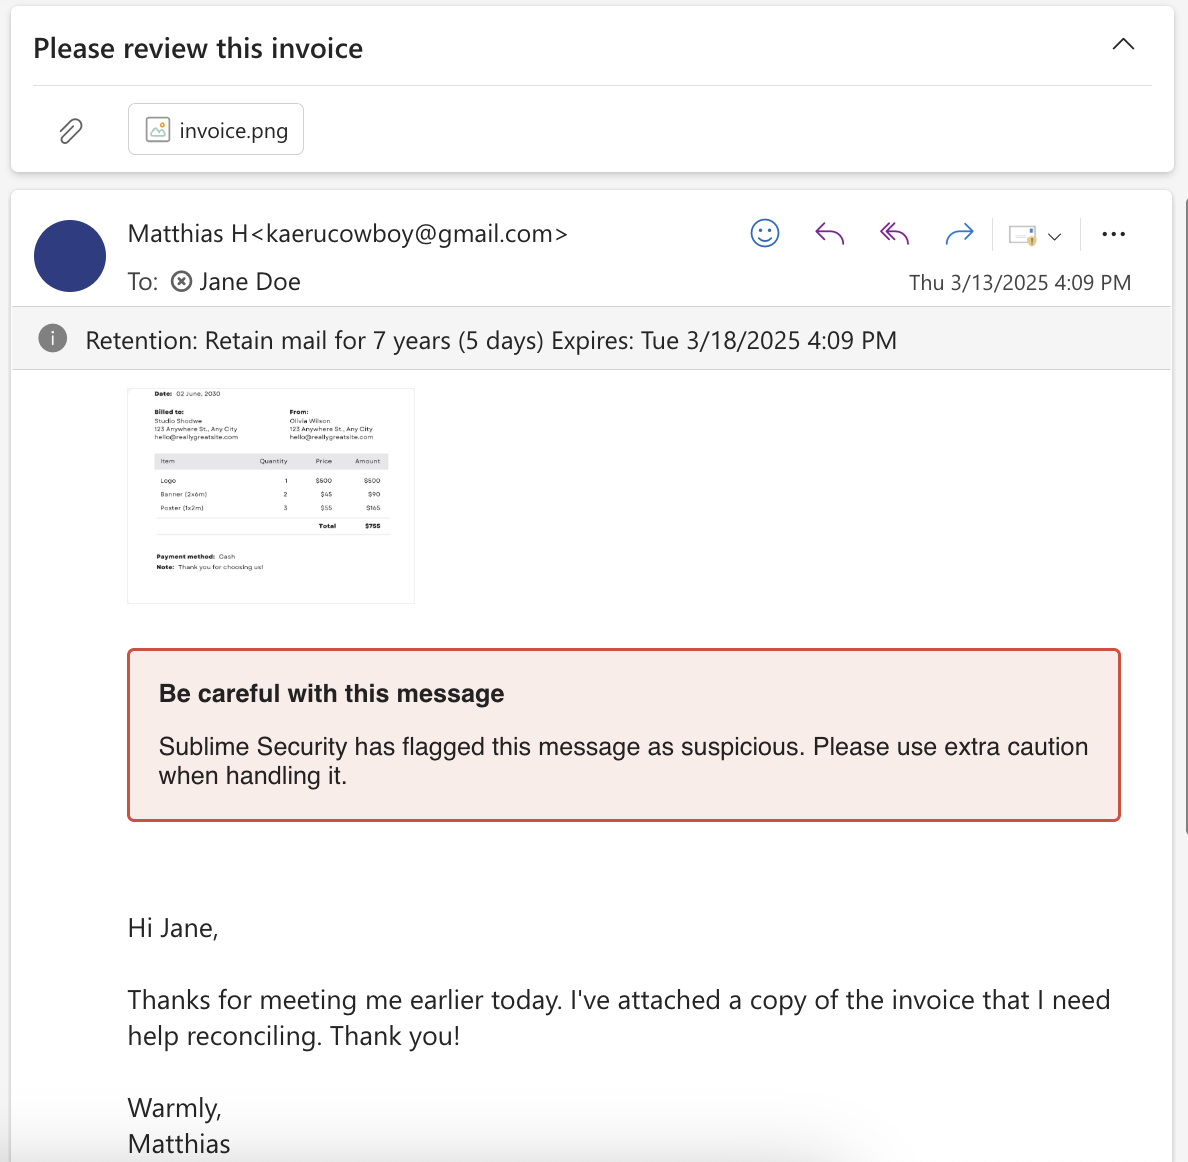
Warning Banners are designed to fill the gap between high-fidelity Rules you set to auto-remediate and low-fidelity Rules that only generate alerts. This new Action applies a banner that alerts users to suspicious email messages.
You can also customize the Warning Banner to fit your organization's tone or workflows.
How to add Warning Banners to Rules
Warning Banners to Rules- Click "Detection Rules" or “Automations” in the left nav of your Dashboard
- Click on the Rule you wish to add the action to, opening the detail view for this Rule
- Click "Edit" or "Edit Metadata" in the top right of this detail view
- Click the "Actions" dropdown and select your Warning Banner Action
- Click "Save Rule"
Sublime's default banner looks like this when applied:
How to create a custom Warning Banner
Warning Banner- Click "Actions" in the left nav of your Dashboard
- Click on the "Warning Banner" Action
- Click "Edit" in the top right of this detail view
- Customize the Name, Header, Description, color, and Active status to your liking
Name and Active status
- Name, up to 50 characters, required. Identifies this Warning Banner Action in your Actions list.
- Active, a toggle. Turn a banner off to stop it from being applied to new messages without deleting it.
Header and description
- Header, up to 200 characters, required.
- Description, up to 600 characters, required.
The Description field supports Markdown: headers, unordered and ordered lists, bold, italics, horizontal rules, blockquotes, and links. Line breaks in your input render as line breaks in the banner. Any raw HTML you paste in is stripped rather than rendered.
Color
Pick a background color from eight preset swatches, or open the custom color picker and enter any 6-character hex code (for example, #FFFFFF). Sublime derives the banner's border color automatically as a slightly darker shade of the background and keeps the header and description text a fixed dark color, so background is the only color you set directly. An unconfigured banner uses the default look: a light red background (#FCECE8), dark gray text (#222222), and a red border (#D94836).
Priority, when multiple banners could apply
Only one Warning Banner is ever shown on a message at a time. If more than one Warning Banner Action could match the same message, priority decides which one wins. Priority only applies to active banners. From the Actions list, open a Warning Banner Action and click "Manage Priority" to drag banners into your preferred order, the higher a banner sits, the higher its priority. The "Manage Priority" button is disabled unless you have the Update Actions permission.
A banner already applied to a message stays in place unless the new candidate banner has a strictly higher priority (a lower priority number). If either the applied banner or the new one has no priority set, that check doesn't apply, and the new banner is applied.
Priority only affects which banner is chosen when multiple Warning Banner Actions could apply to the same message. It does not control whether a banner is applied in the first place, that's still driven by the Rule or Automation the Action is attached to.
Removing a banner
Removing a Warning Banner from a message requires a manual action. Deactivating or deleting a Warning Banner Action does not strip a banner that's already been applied to a message. To remove an applied banner, select the message group and choose "Hide Banner" (or, if you are also restoring the message from Trash, Spam, or Quarantine, the matching "Restore & Hide Banner" option).
Supported providers
Warning Banners work across Google Workspace, Microsoft 365, and IMAP-connected mailboxes.
Updated 3 months ago