Okta
Configure Single Sign-On between Sublime and Okta
SAML Configuration
Below are the steps for setting up SAML with Okta.
Obtain Your Sublime Single Sign-on URL
- Sign in to your Sublime instance. Navigate to
Admin > Account - Scroll down and under the
Authenticationsection, click the pencil icon next toSAML - Copy/take note of the
Single Sign-on URL. You'll use this URL in the next section when configuring SAML for your Okta application.
Okta Configuration
- Sign into your Okta admin console
- On the left-side navigation bar, navigate to
Applications > Applications - Select
Create App Integration - In the modal that opens, select Sign-in method of
SAML 2.0
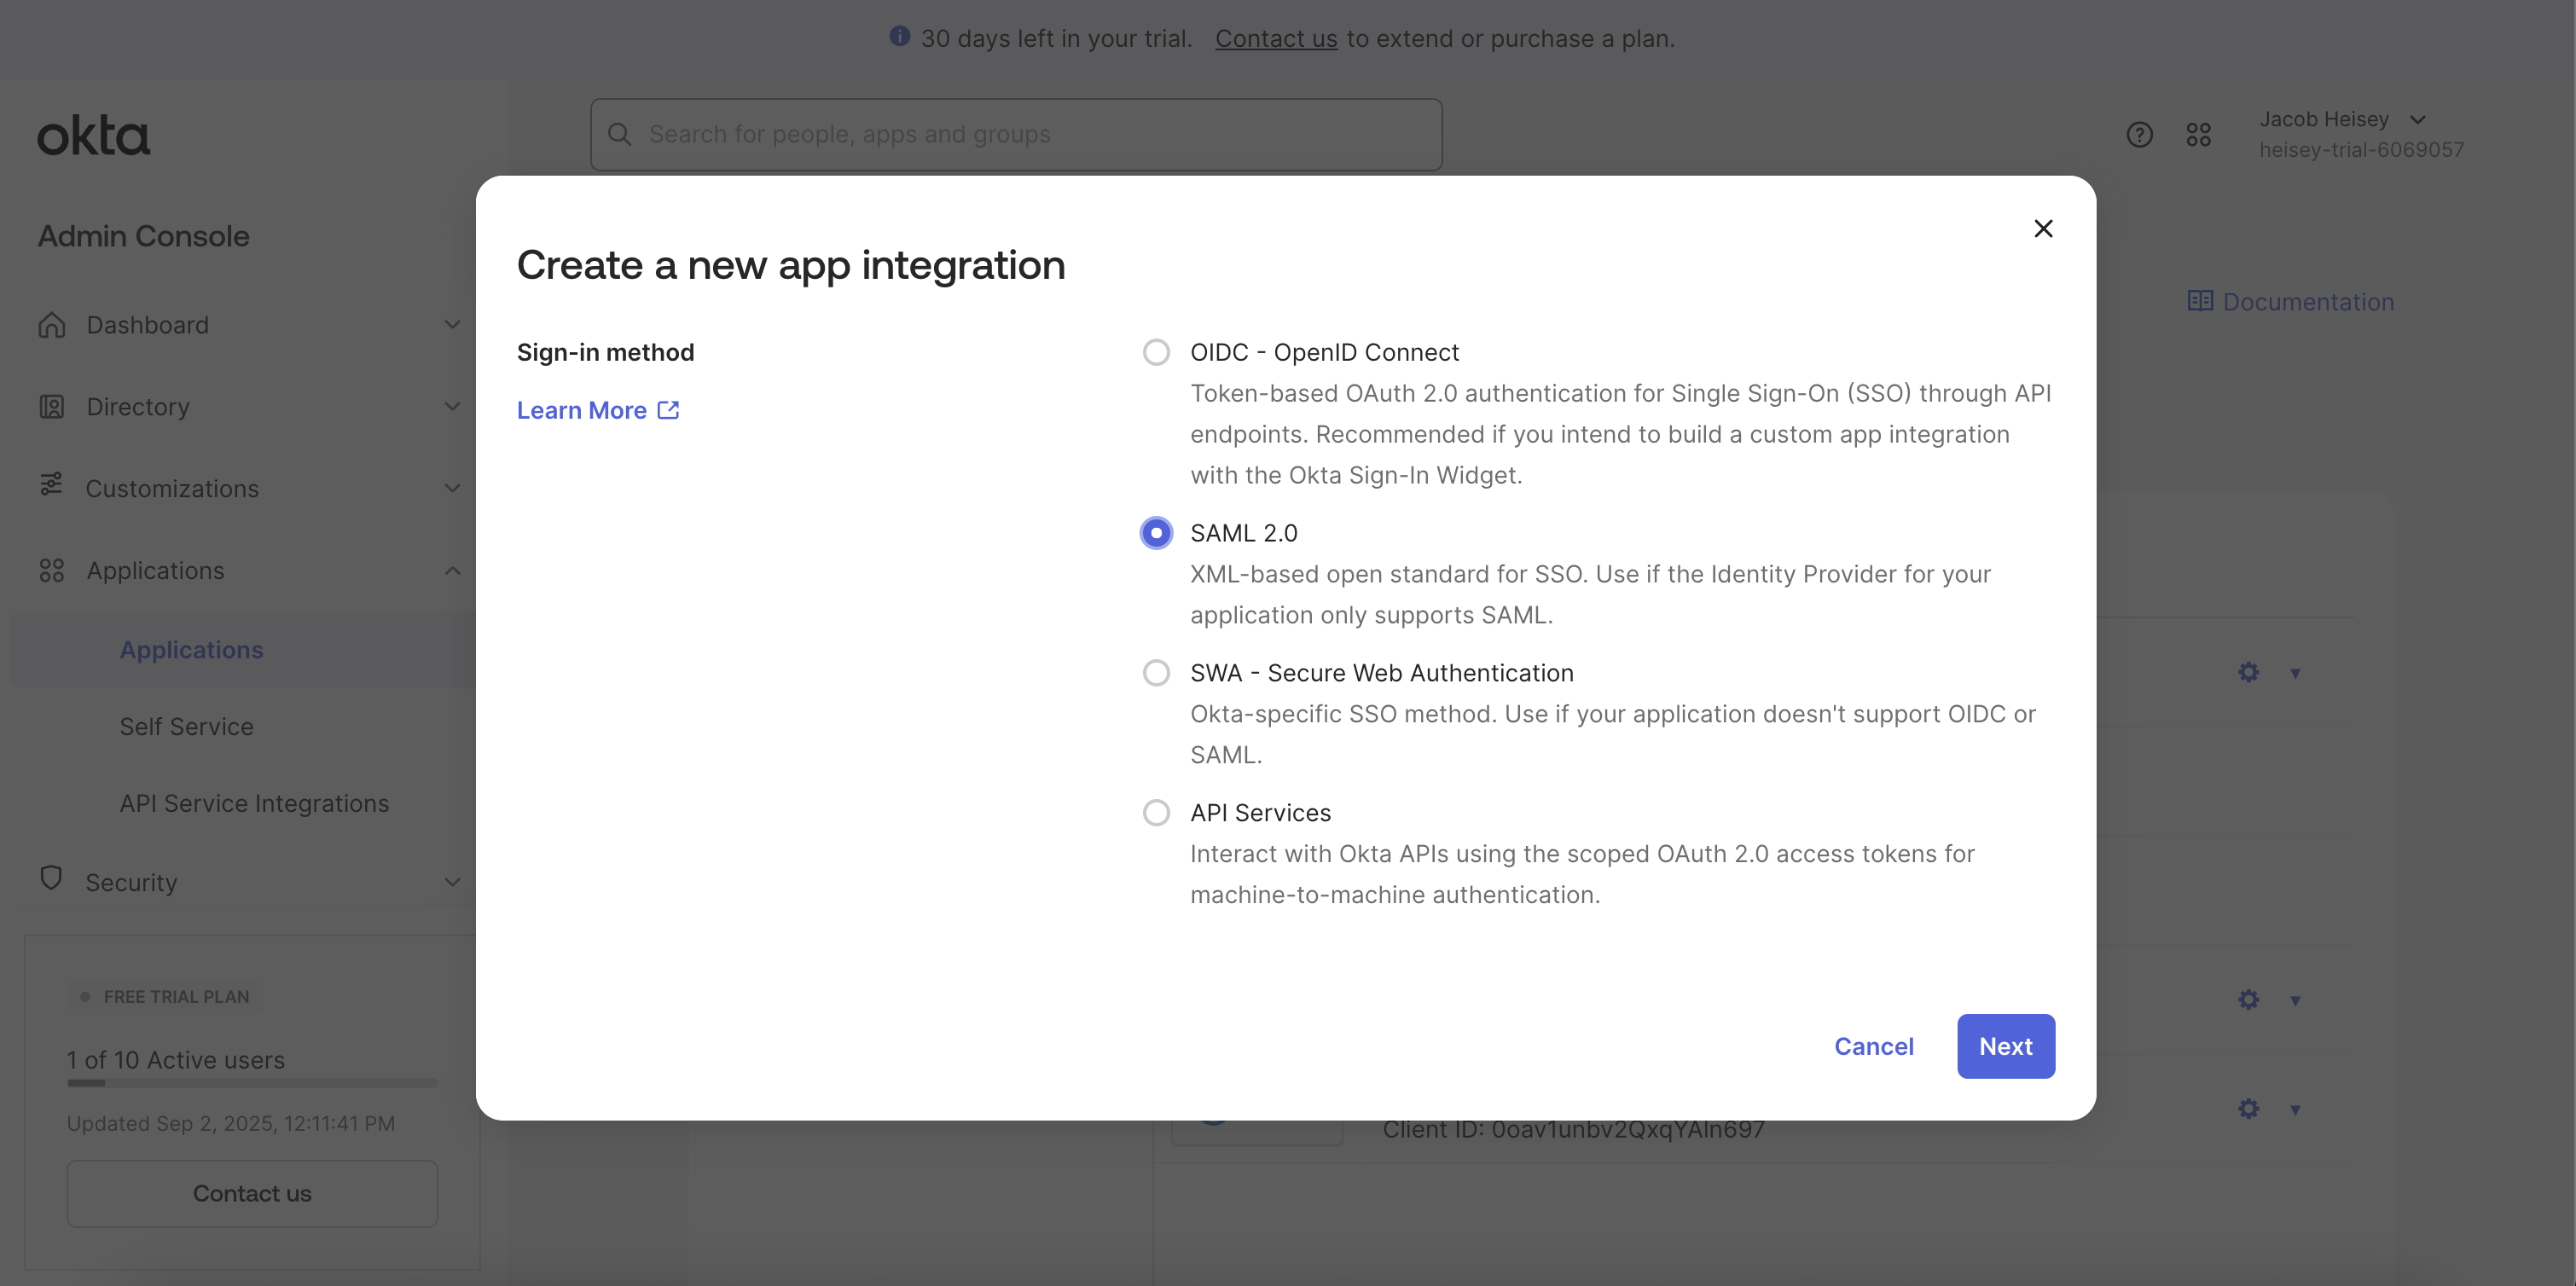
- Click
Next - Provide an App name, such as "Sublime Platform"
- Optionally add a logo. You can download the Sublime logo here.
- Click
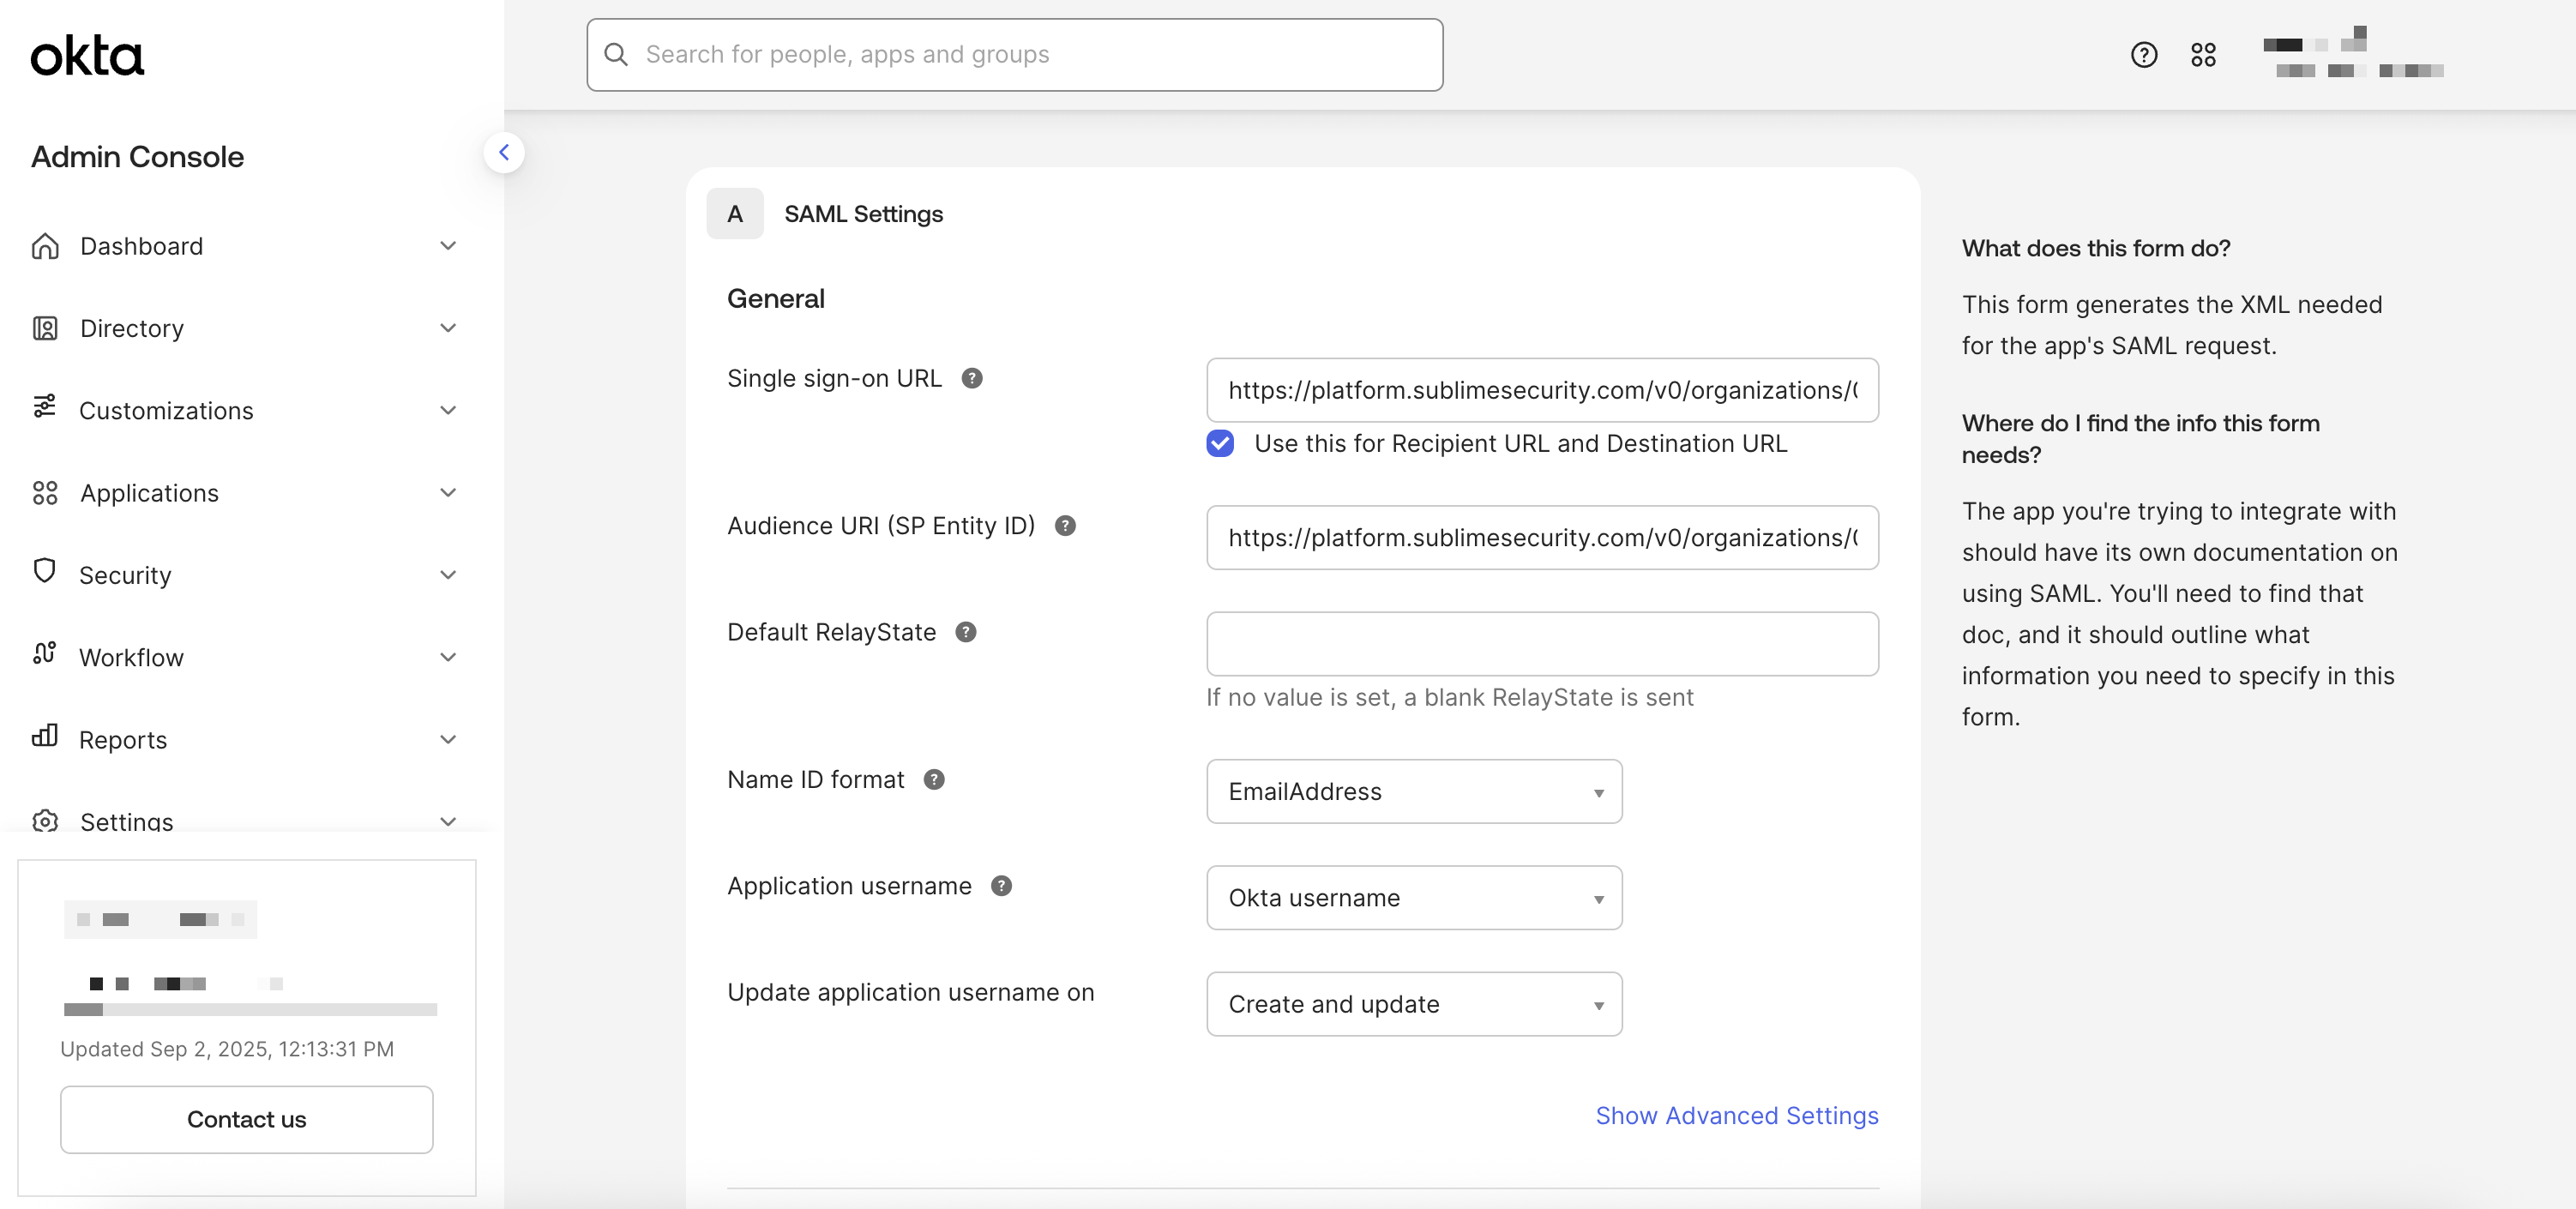
Next - For Single sign-on URL, paste the
Single Sign-on URLyou copied from the Sublime dashboard - Be sure Use this for Recipient URL and Destination URL is checked
- For Audience URI (SP Entity ID), also paste the Single Sign-on URL you copied from the Sublime dashboard
- For Name ID format, select
Email Address - For Update application username on, select
Create and update - Leave all other settings as their defaults
Example completed configuration
- Click
Next - Click
Finish - Click the
Sign Ontab of the new Okta app - Copy the
Metadata URL
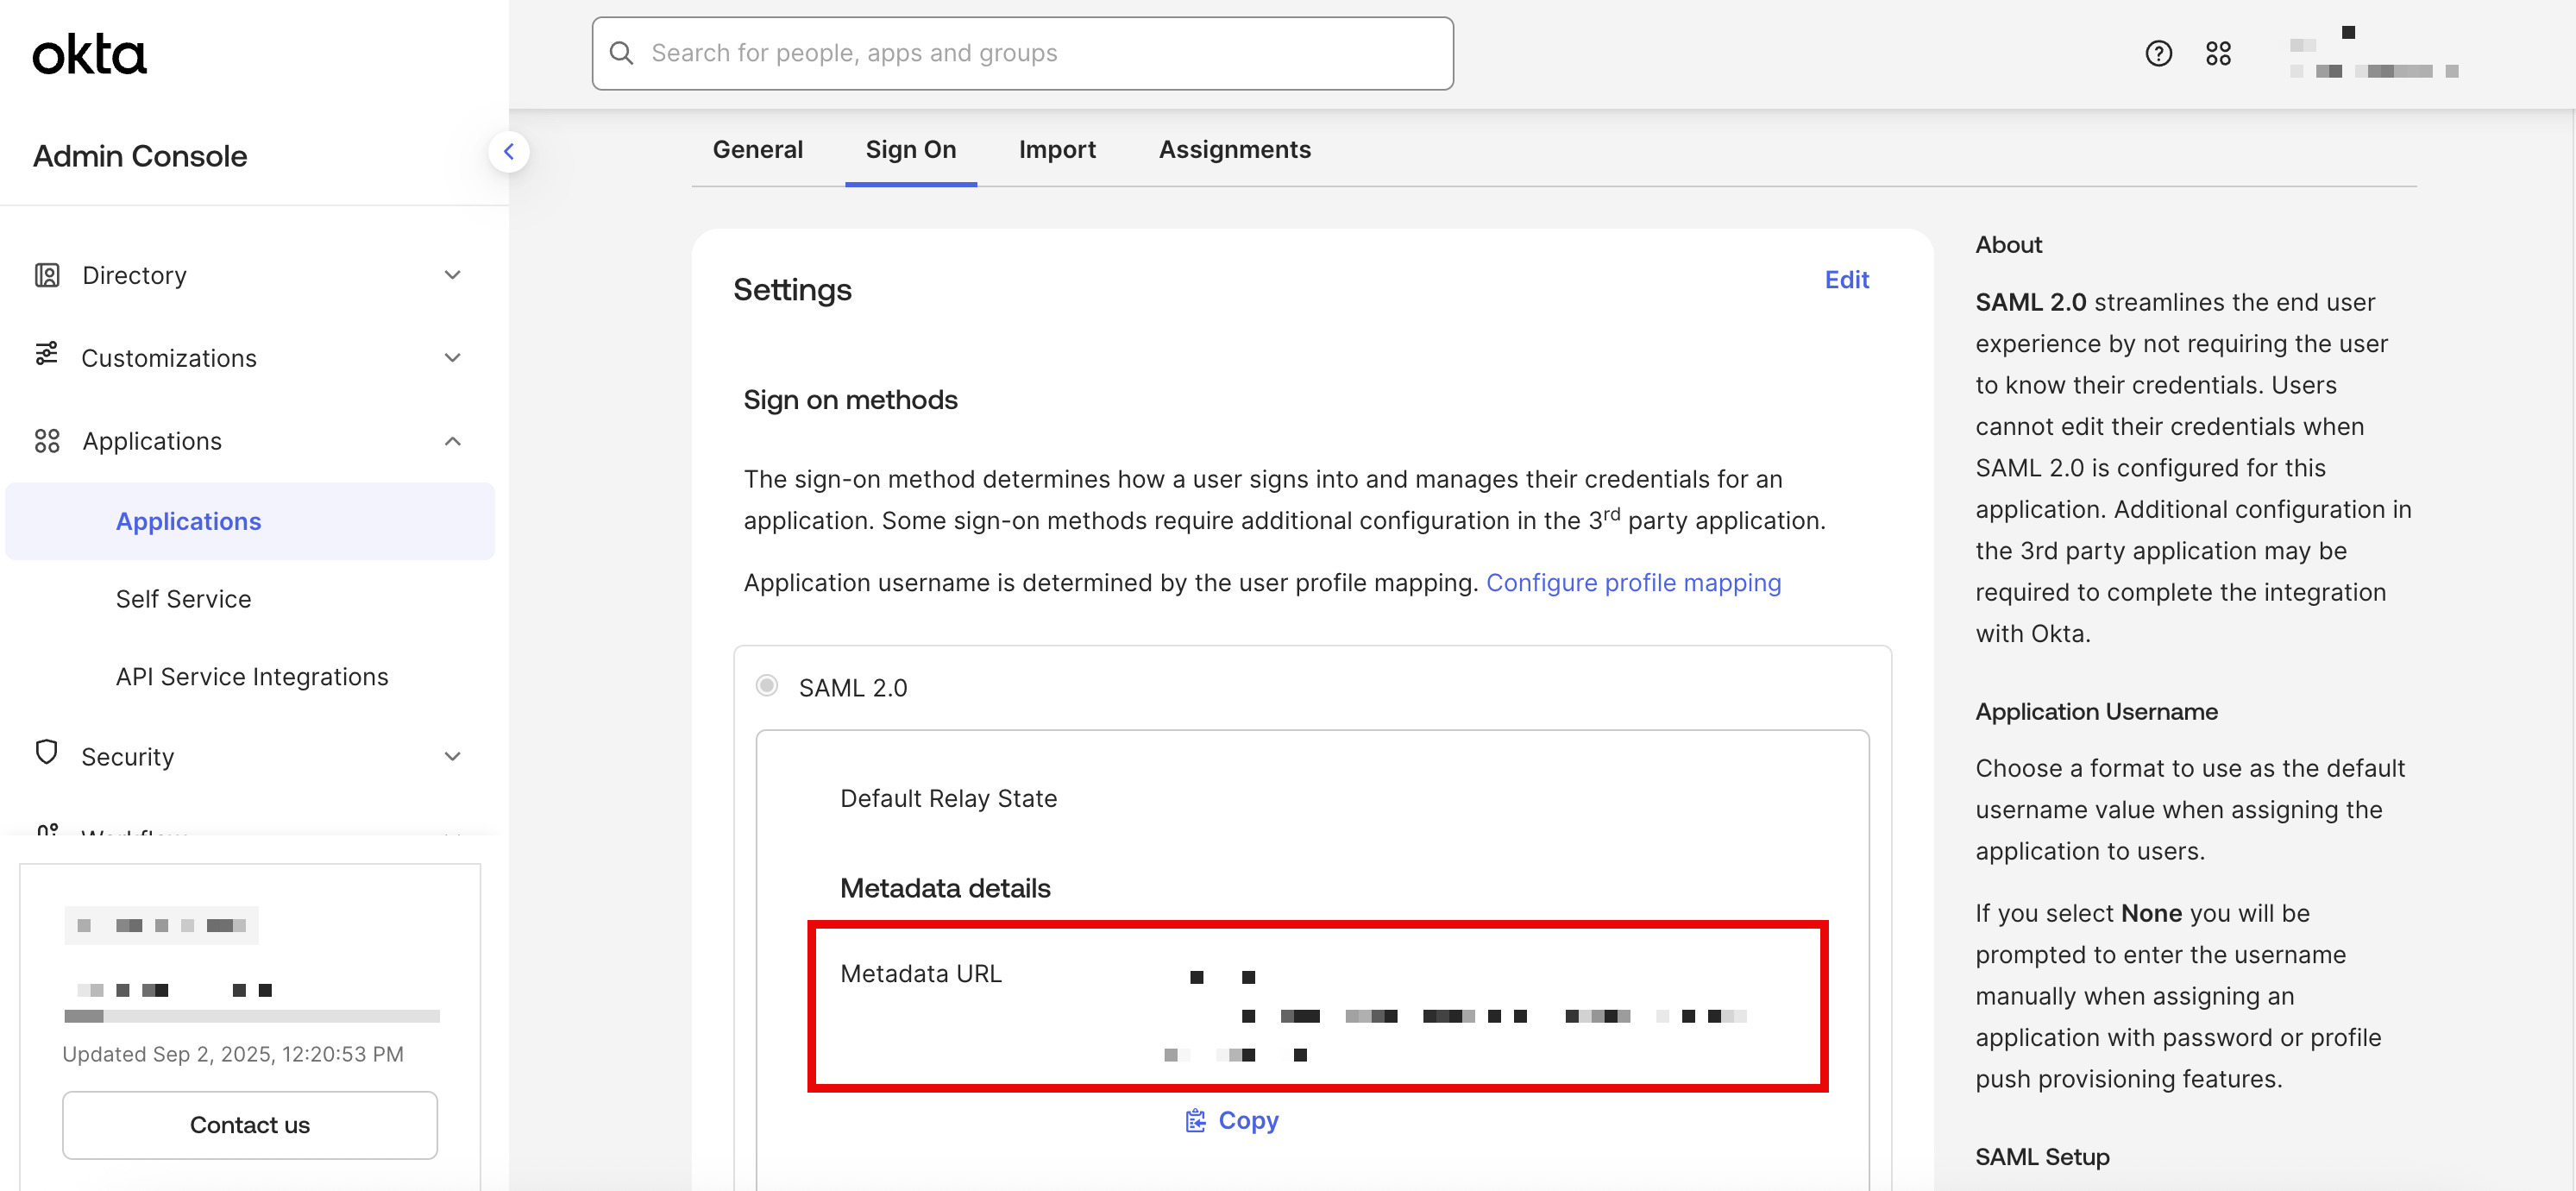
Metadata URL to be used for Sublime
Add SAML Settings to Sublime
- In Sublime, navigate to
Admin > Account - Under
Authentication, click the button next to SAML - Under Metadata URL, paste the metadata URL you copied from Okta
- Click
Save
Test SAML Configuration
- Add/Ensure the expected user(s) to test are present in both the Sublime Console and the Okta Sublime Application.
- In the Single sign-on section of the the Sublime Enterprise app, Click Test and then Test Sign-on
- If successful, you can now change the Sublime Allowed methods config to disable username/password login.
- If unsuccessful, please double check all fields with URL values across both platforms and contact us if you're still running into any issues 👋
OIDC Configuration
Below are the steps for obtaining OIDC settings via Okta.
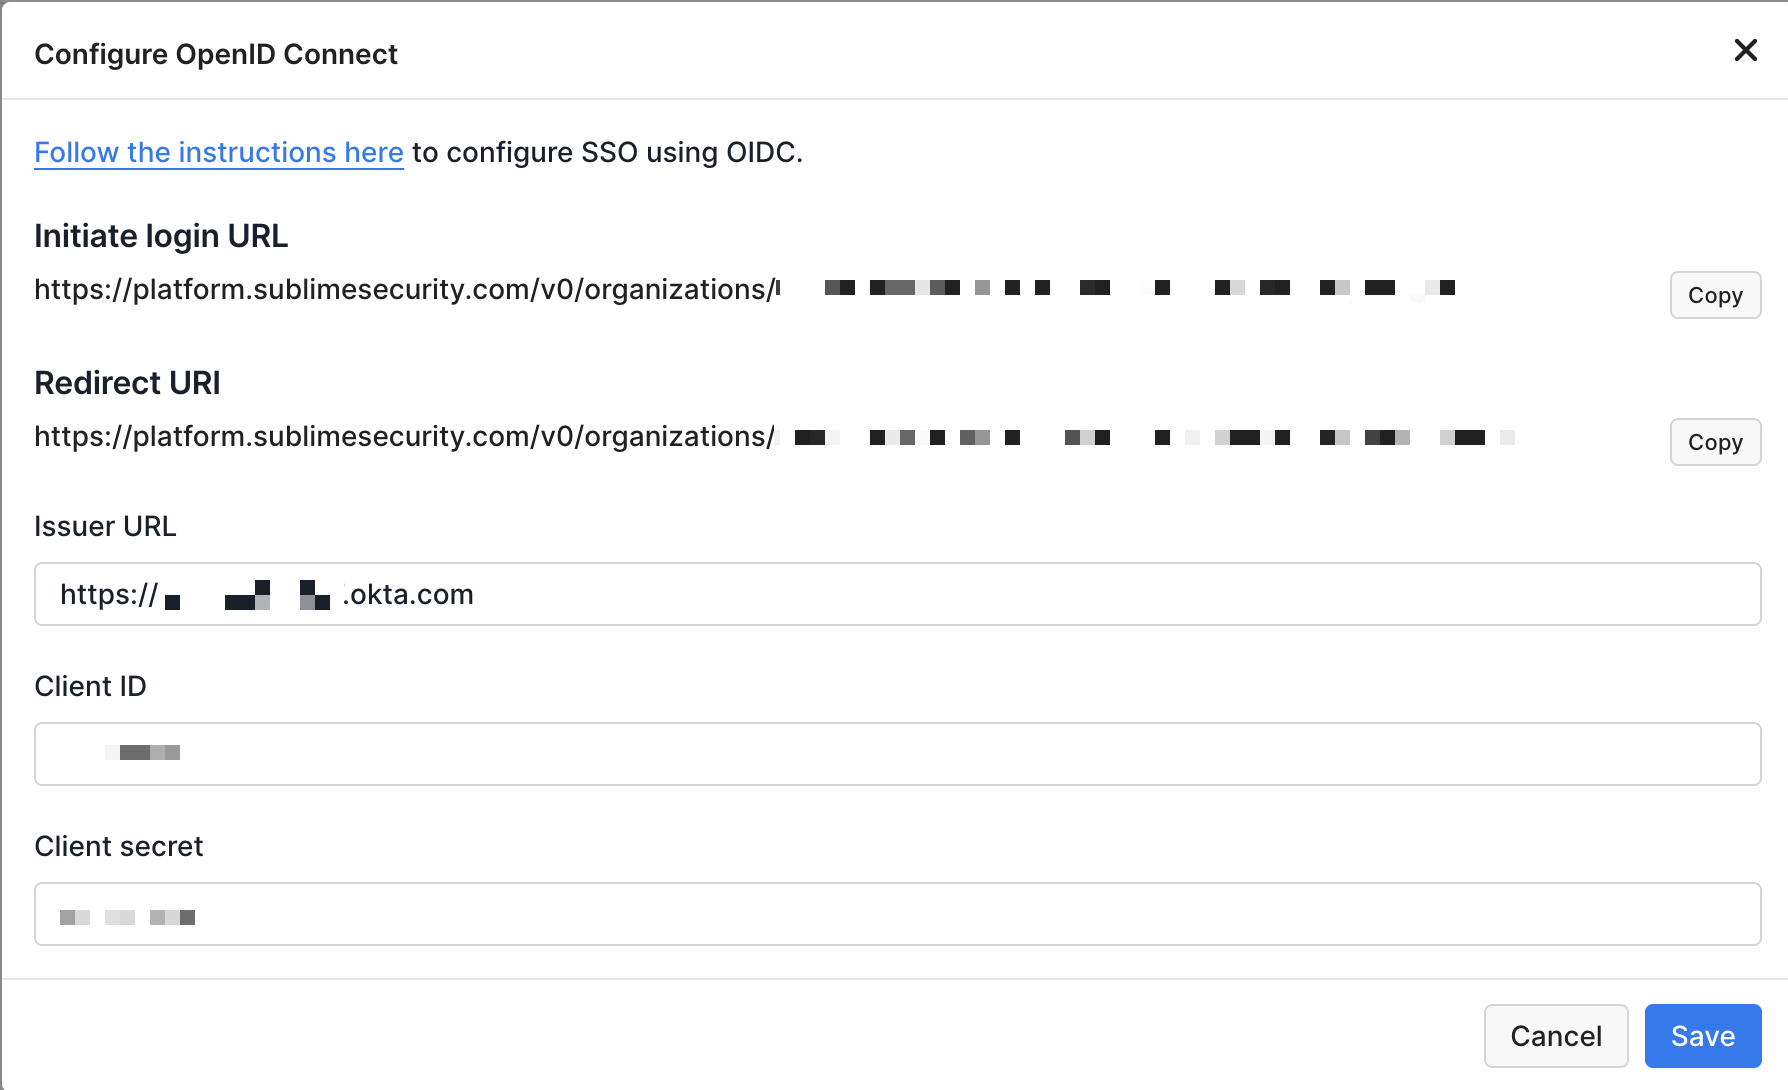
Open the OIDC settings modal in Sublime
- Sign in to your Sublime instance. Navigate to
Admin > Account - Scroll down and under the
Authenticationsection, click the pencil icon next toOpen ID Connect - Copy/take note of the
Redirect URI. You'll use this URL in the next section when configuring OIDC for your Okta application.
Okta Configuration
- Sign into your Okta admin console
- On the left-side navigation bar, navigate to
Applications > Applications - Click
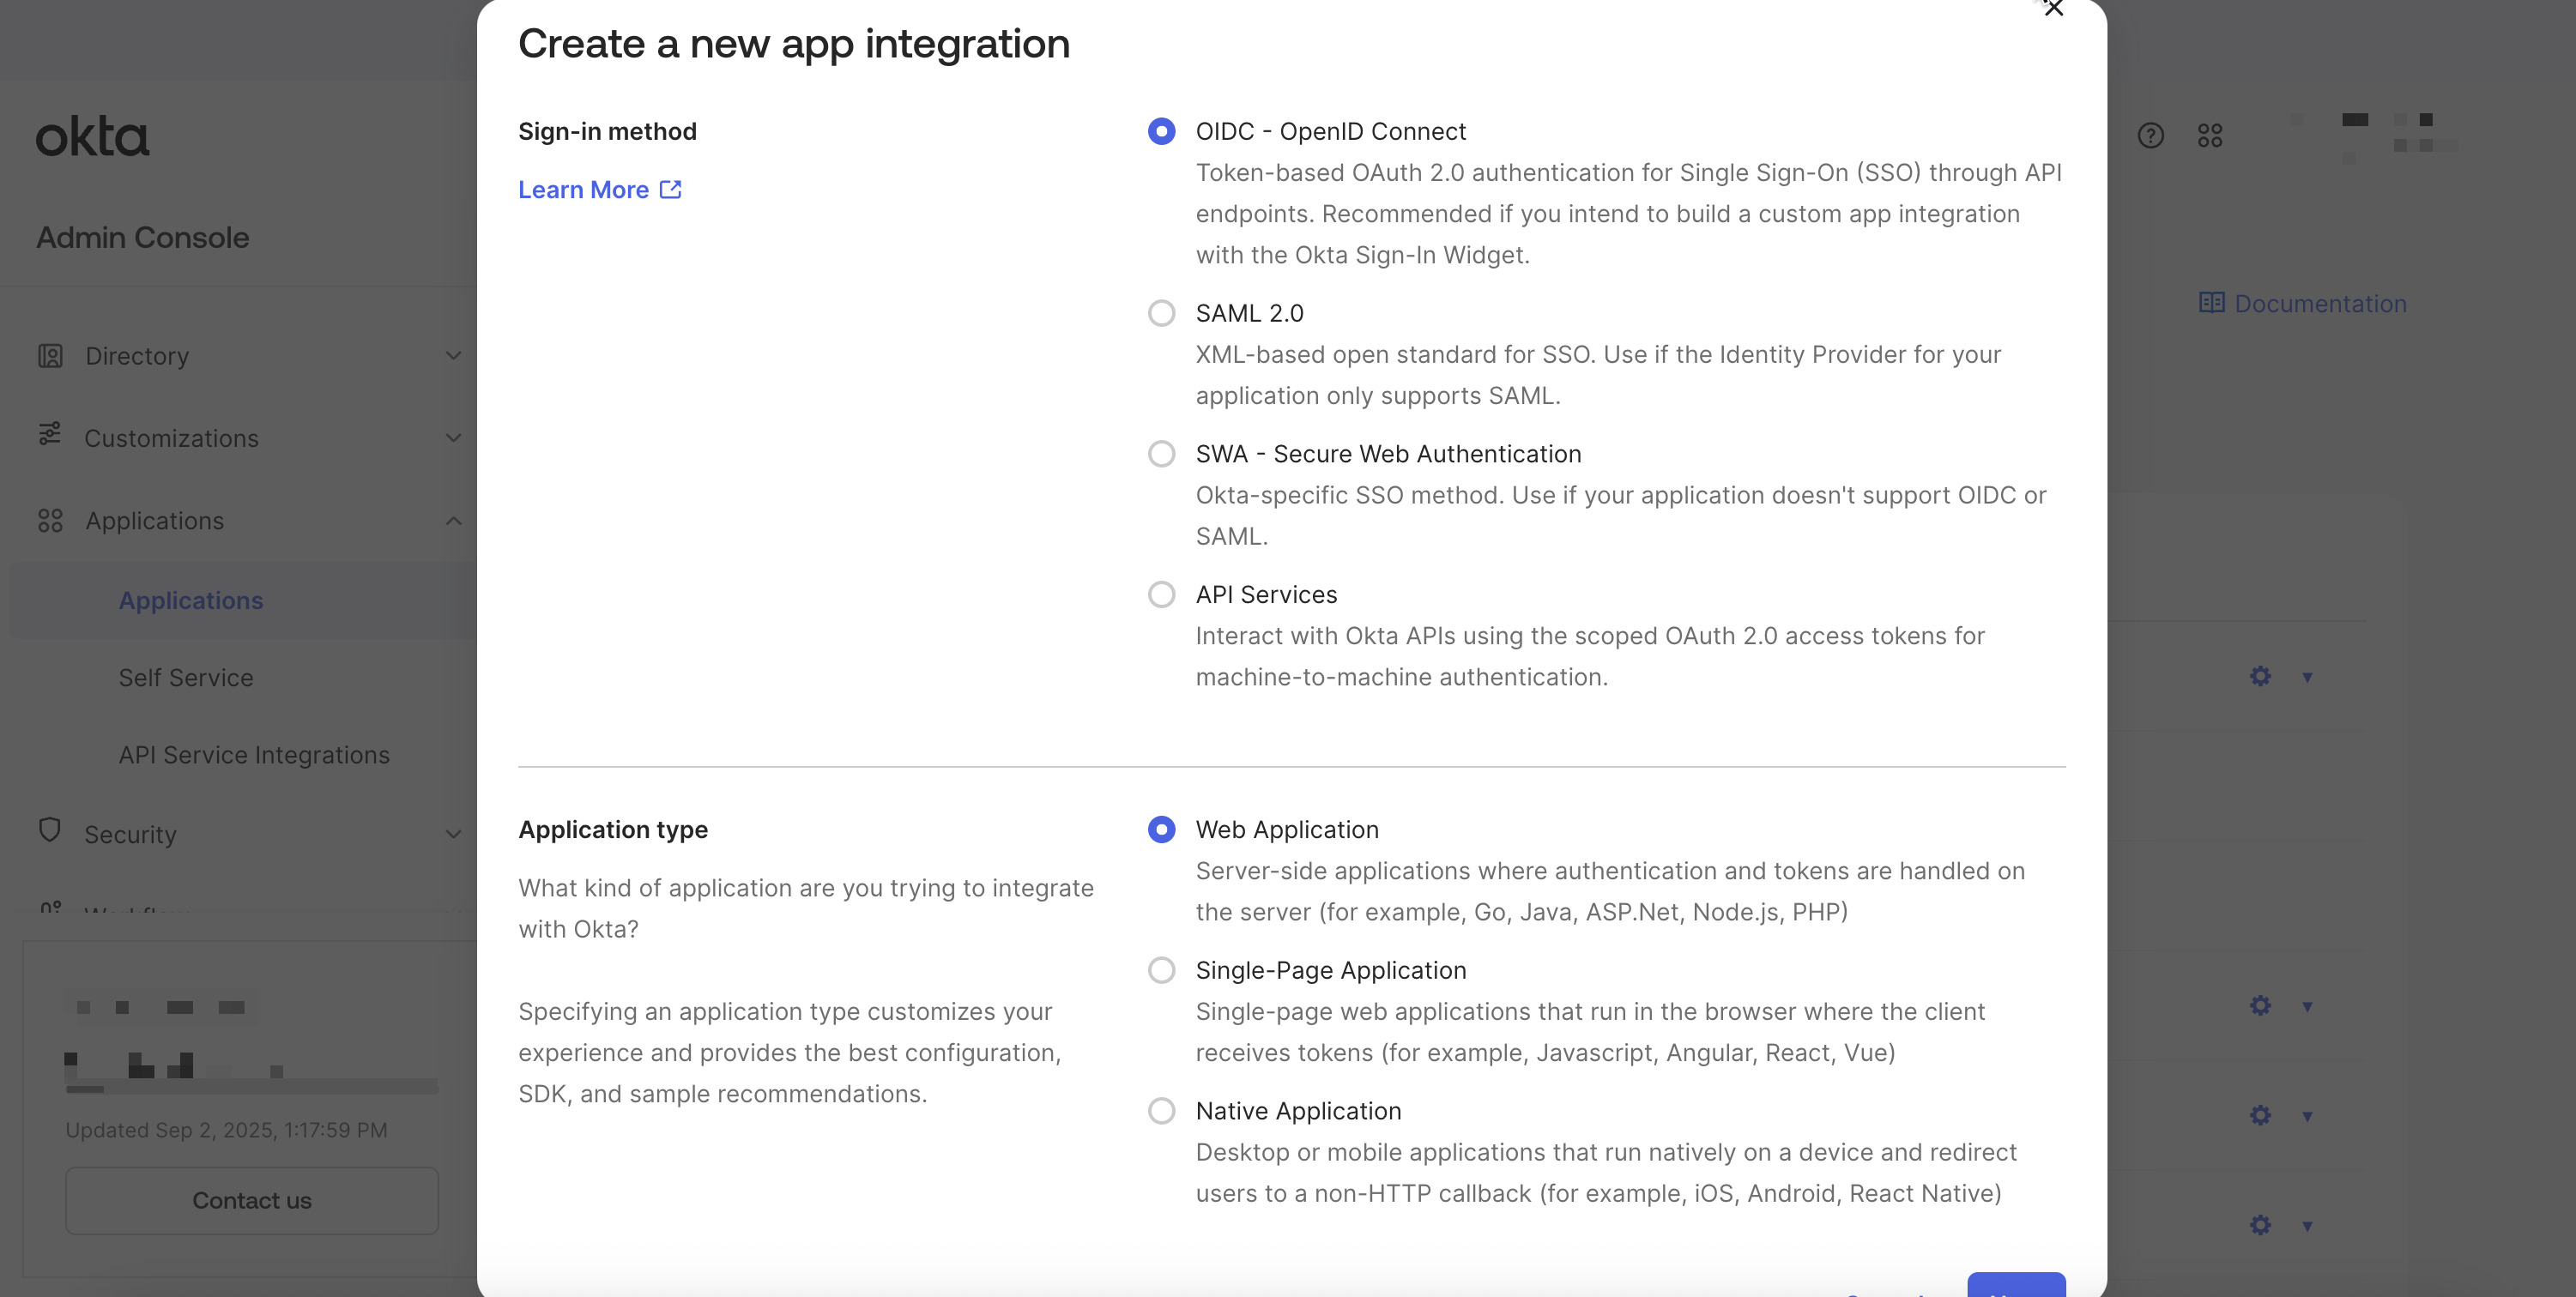
Create App Integration - In the modal that opens, select Sign-in method of
OIDC - OpenID Connect - Select Application type of
Web Application
- Click
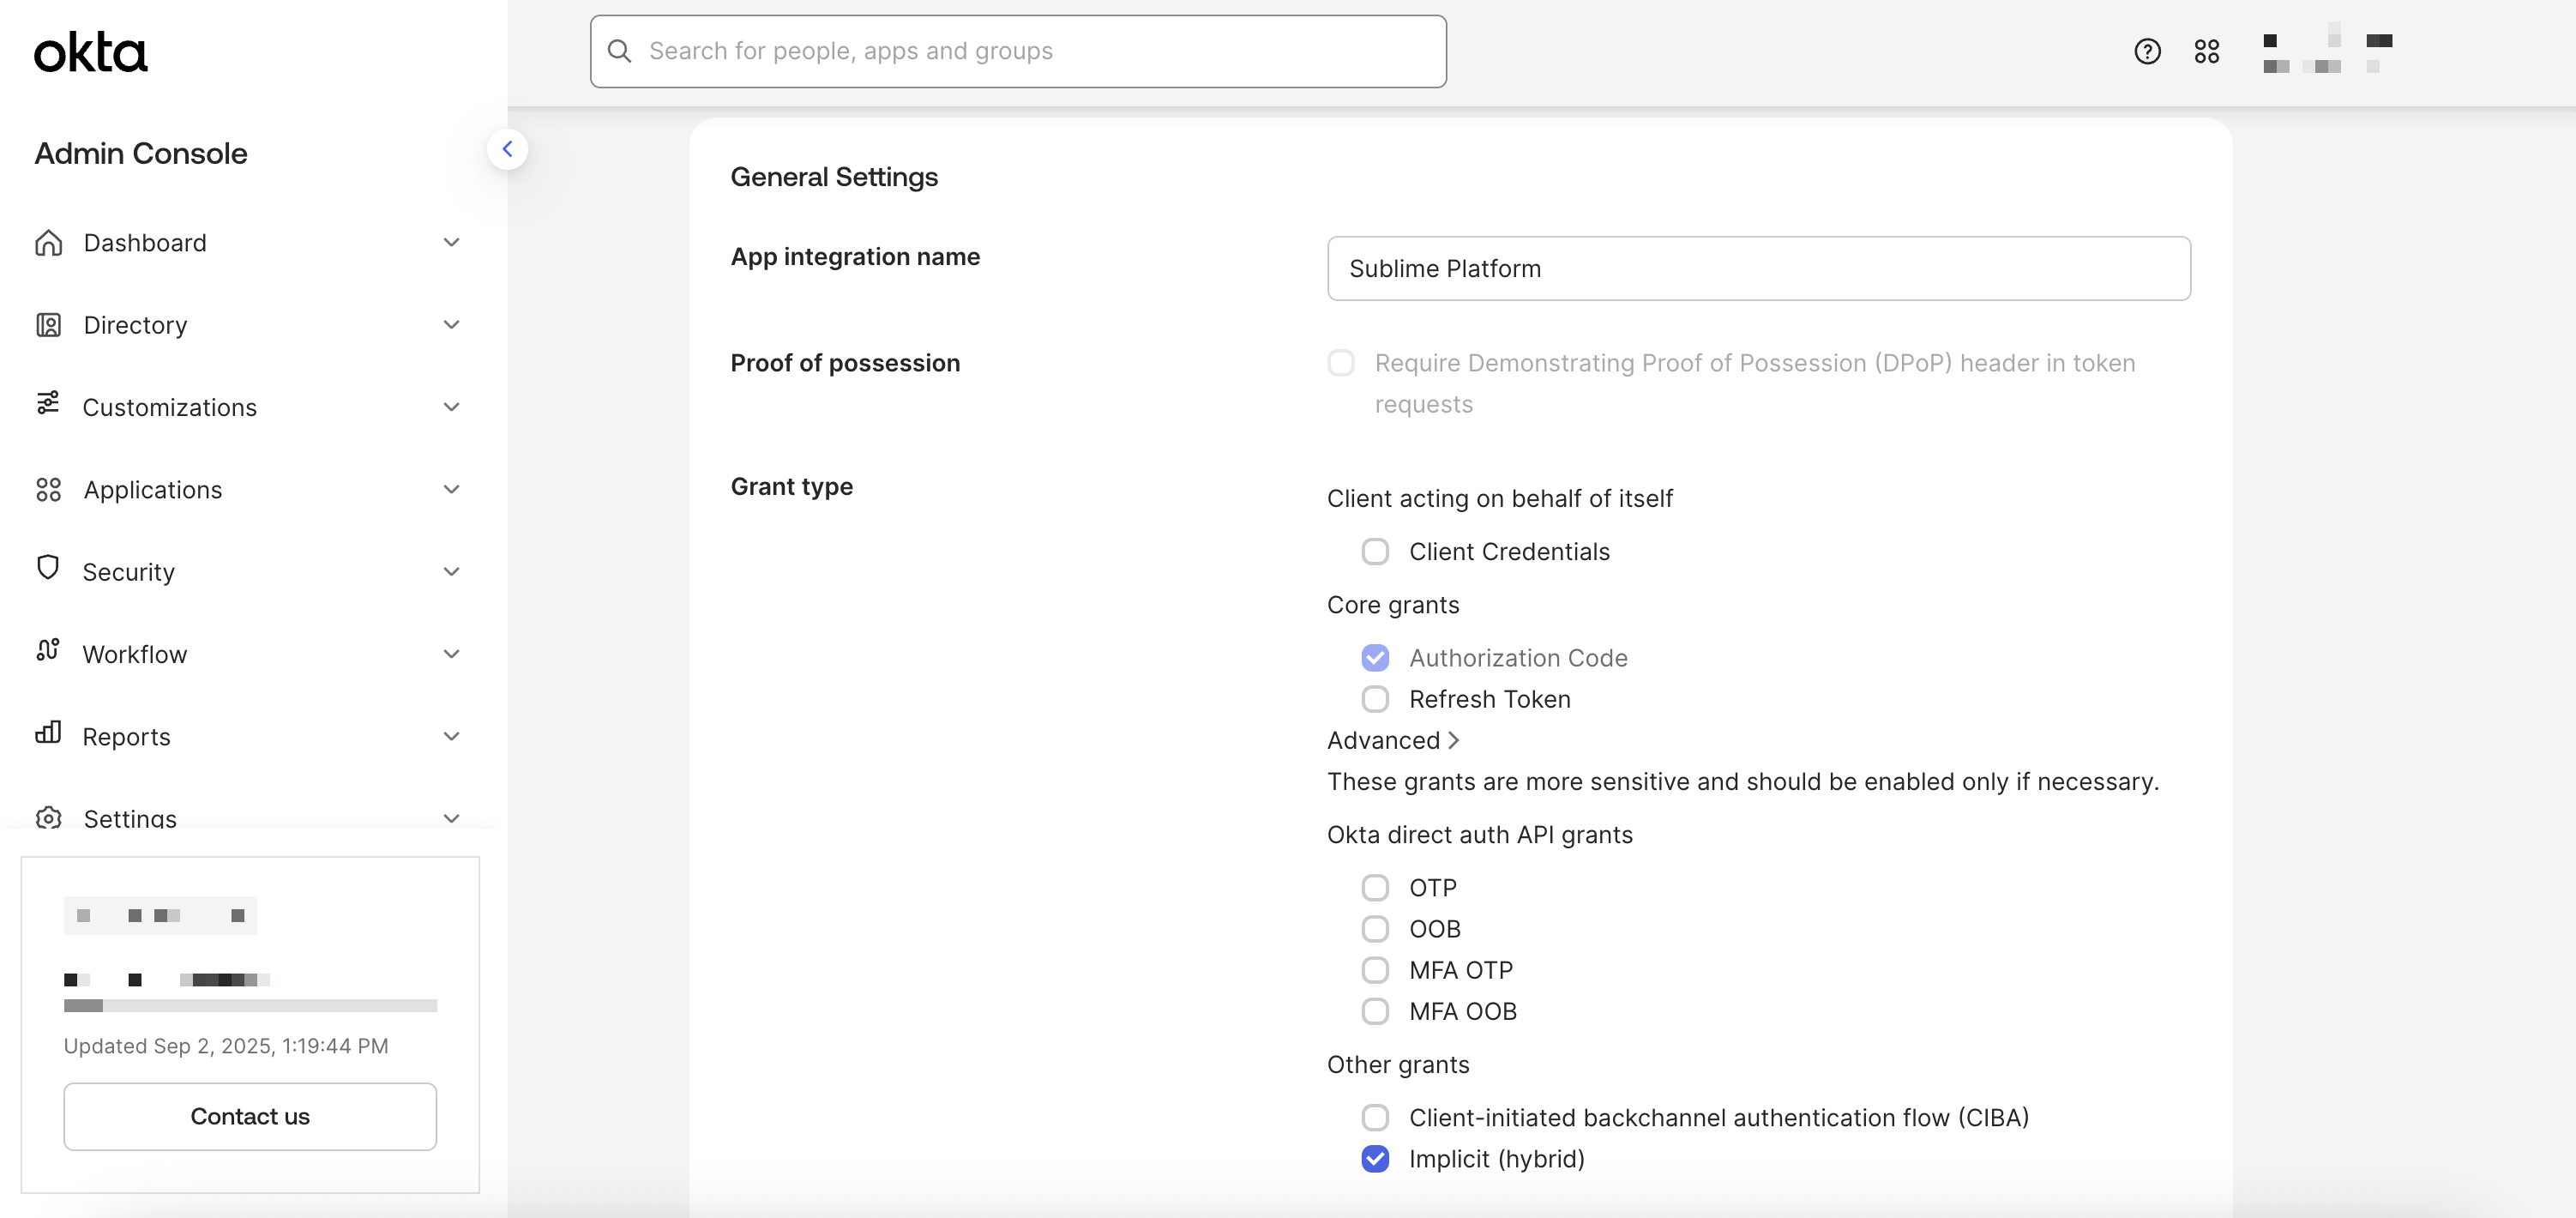
Next - Provide an App integration name, such as "Sublime Platform"
- Optionally add a logo. You can download the Sublime logo here.
- In the Grant type section, under "Advanced" select
Implicit (Hybrid)
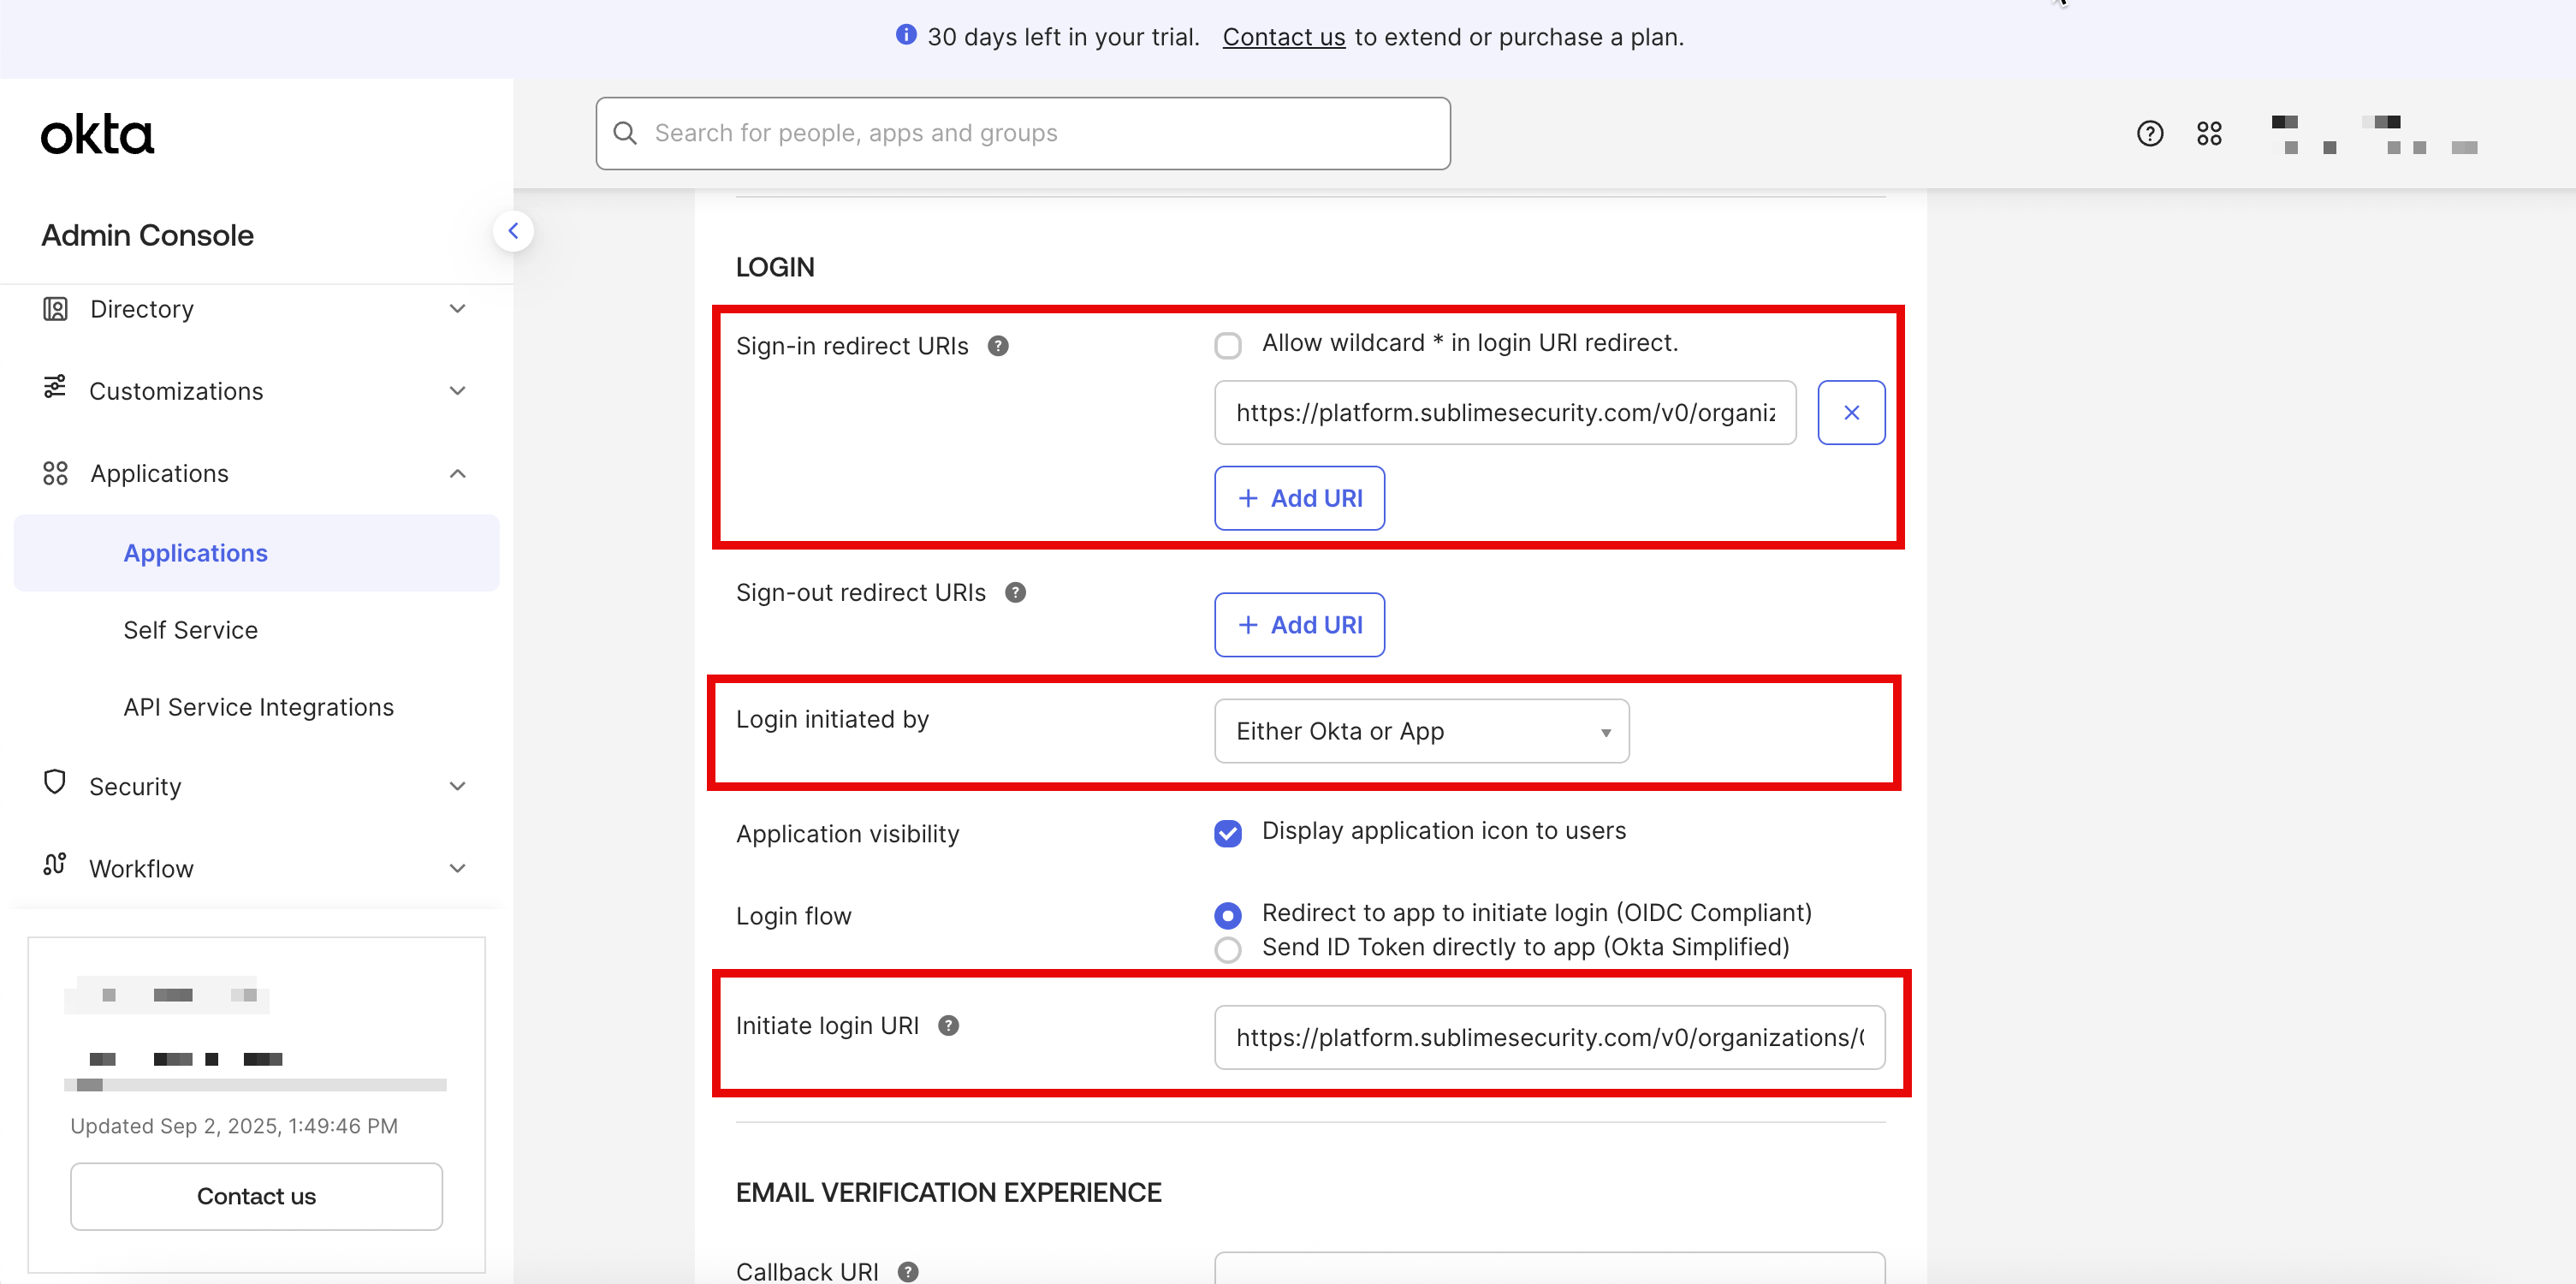
- In Sign-in redirect URIs, paste the
Redirect URIfrom Sublime - Remove the default entry in
Sign-out redirect URIs - In the Controlled access section, select your preferred option
- Click
Save - Click the Edit button in the General Settings section
- In Login initiated by, select
Either Okta or App - In Initiate login URI, paste the
Initiate login URLfrom Sublime - Next to Application visibility, check
Display application icon to usersand optionally check Display application icon in the Okta Mobile app - Click
Save
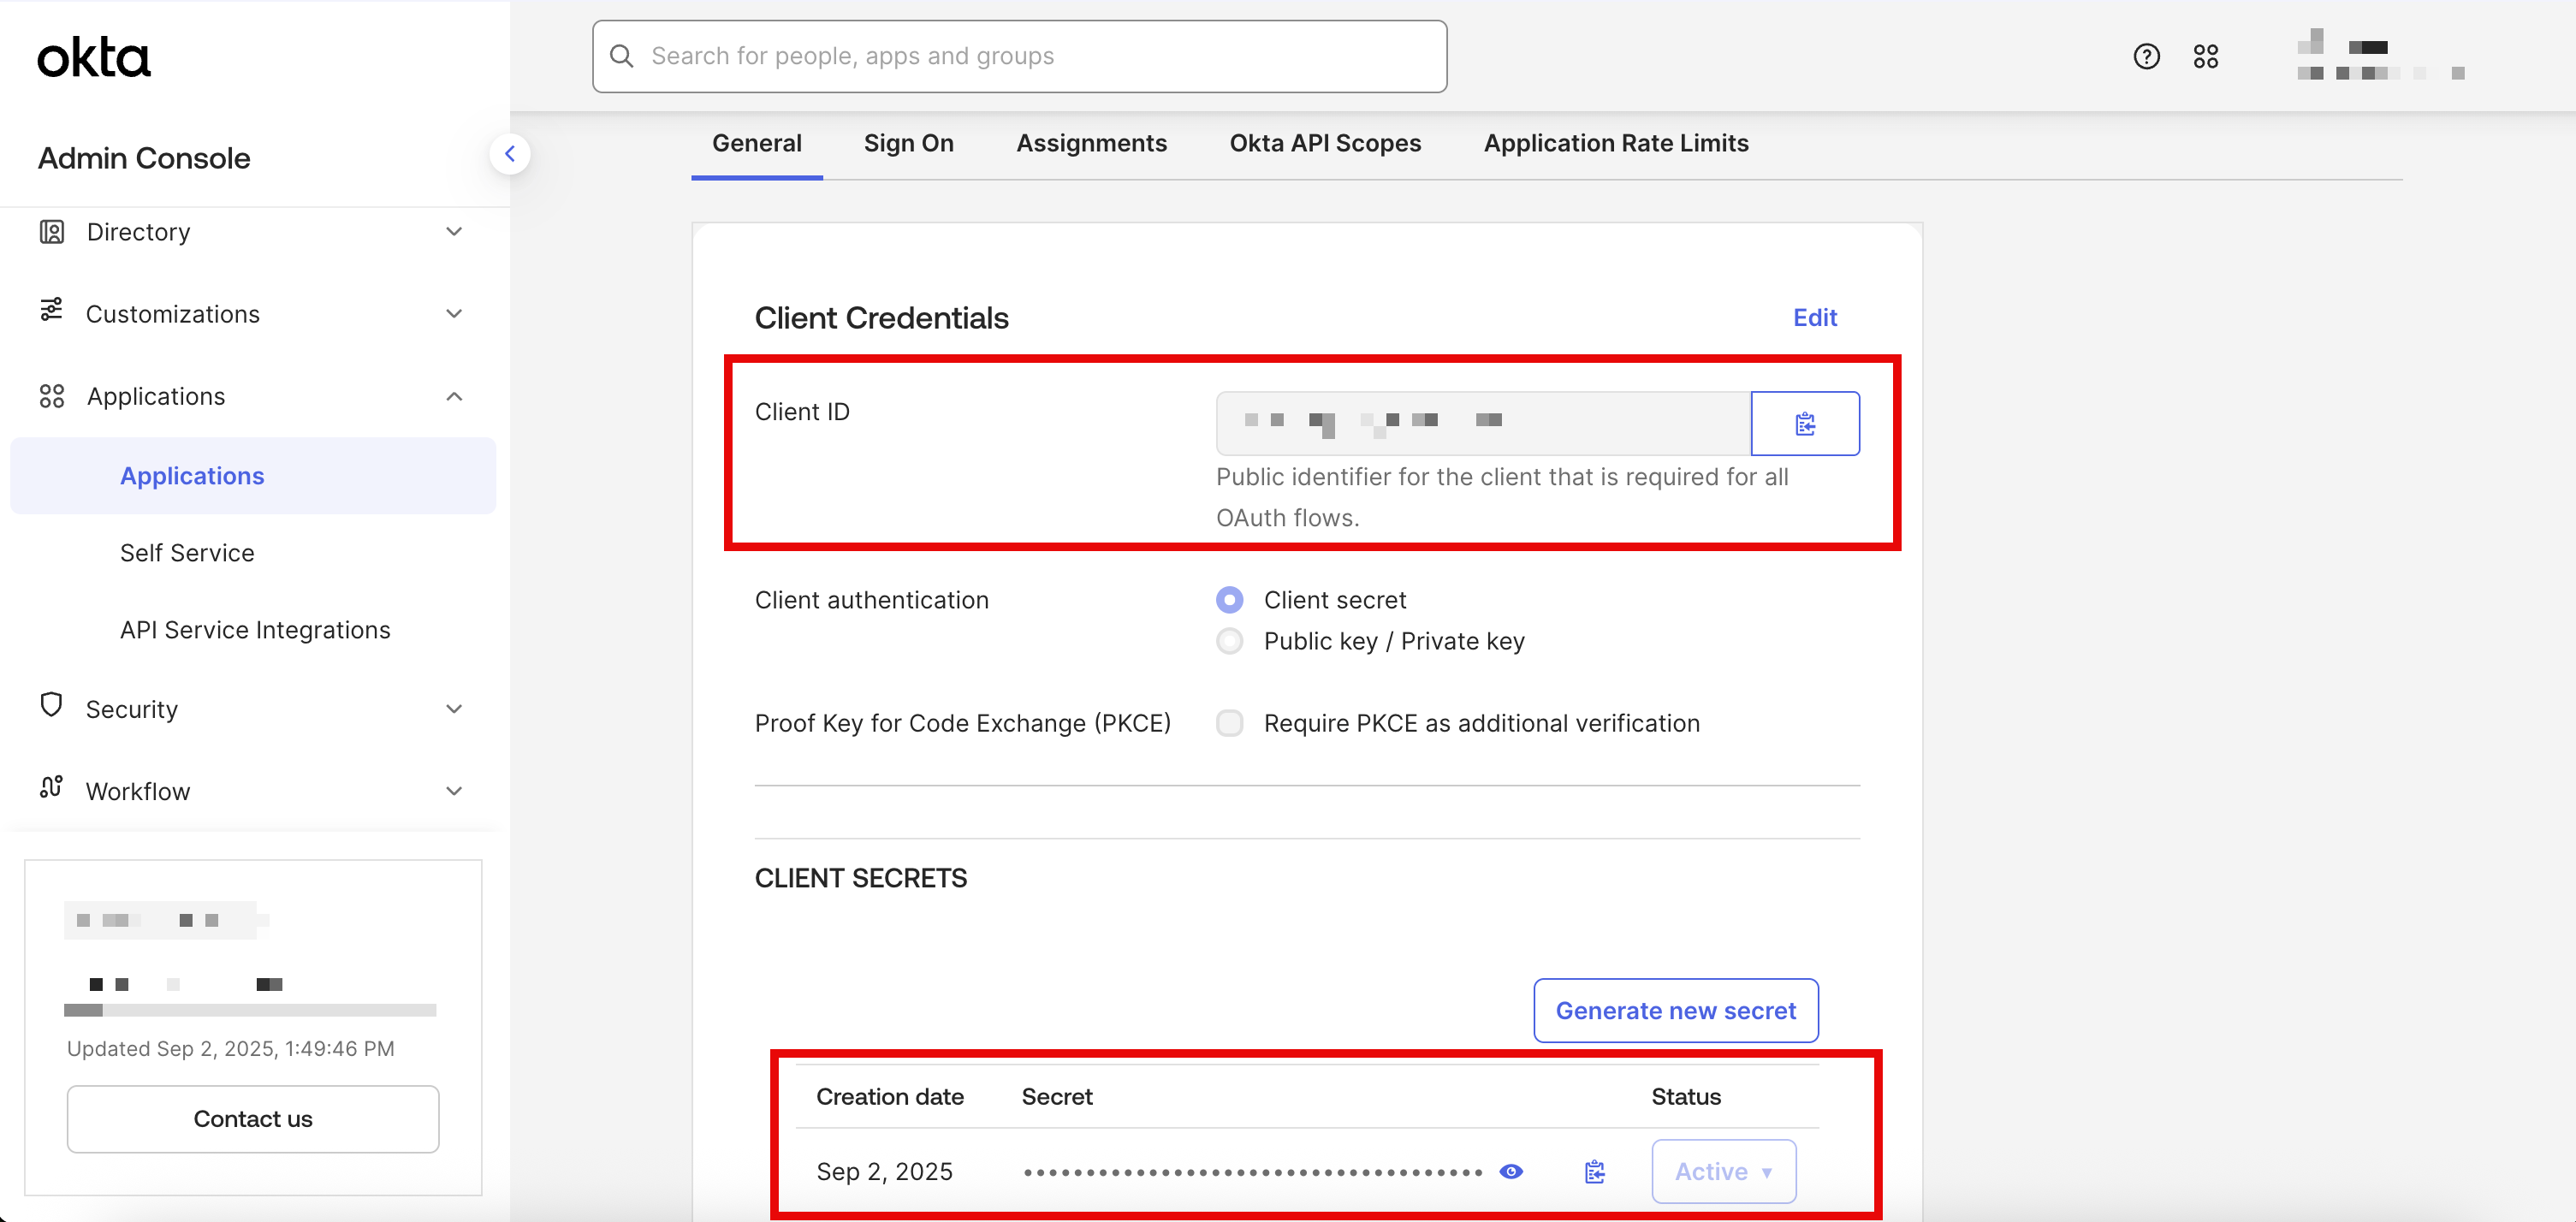
- Note the
Client IDandClient Secretfrom the current page
-
Click the
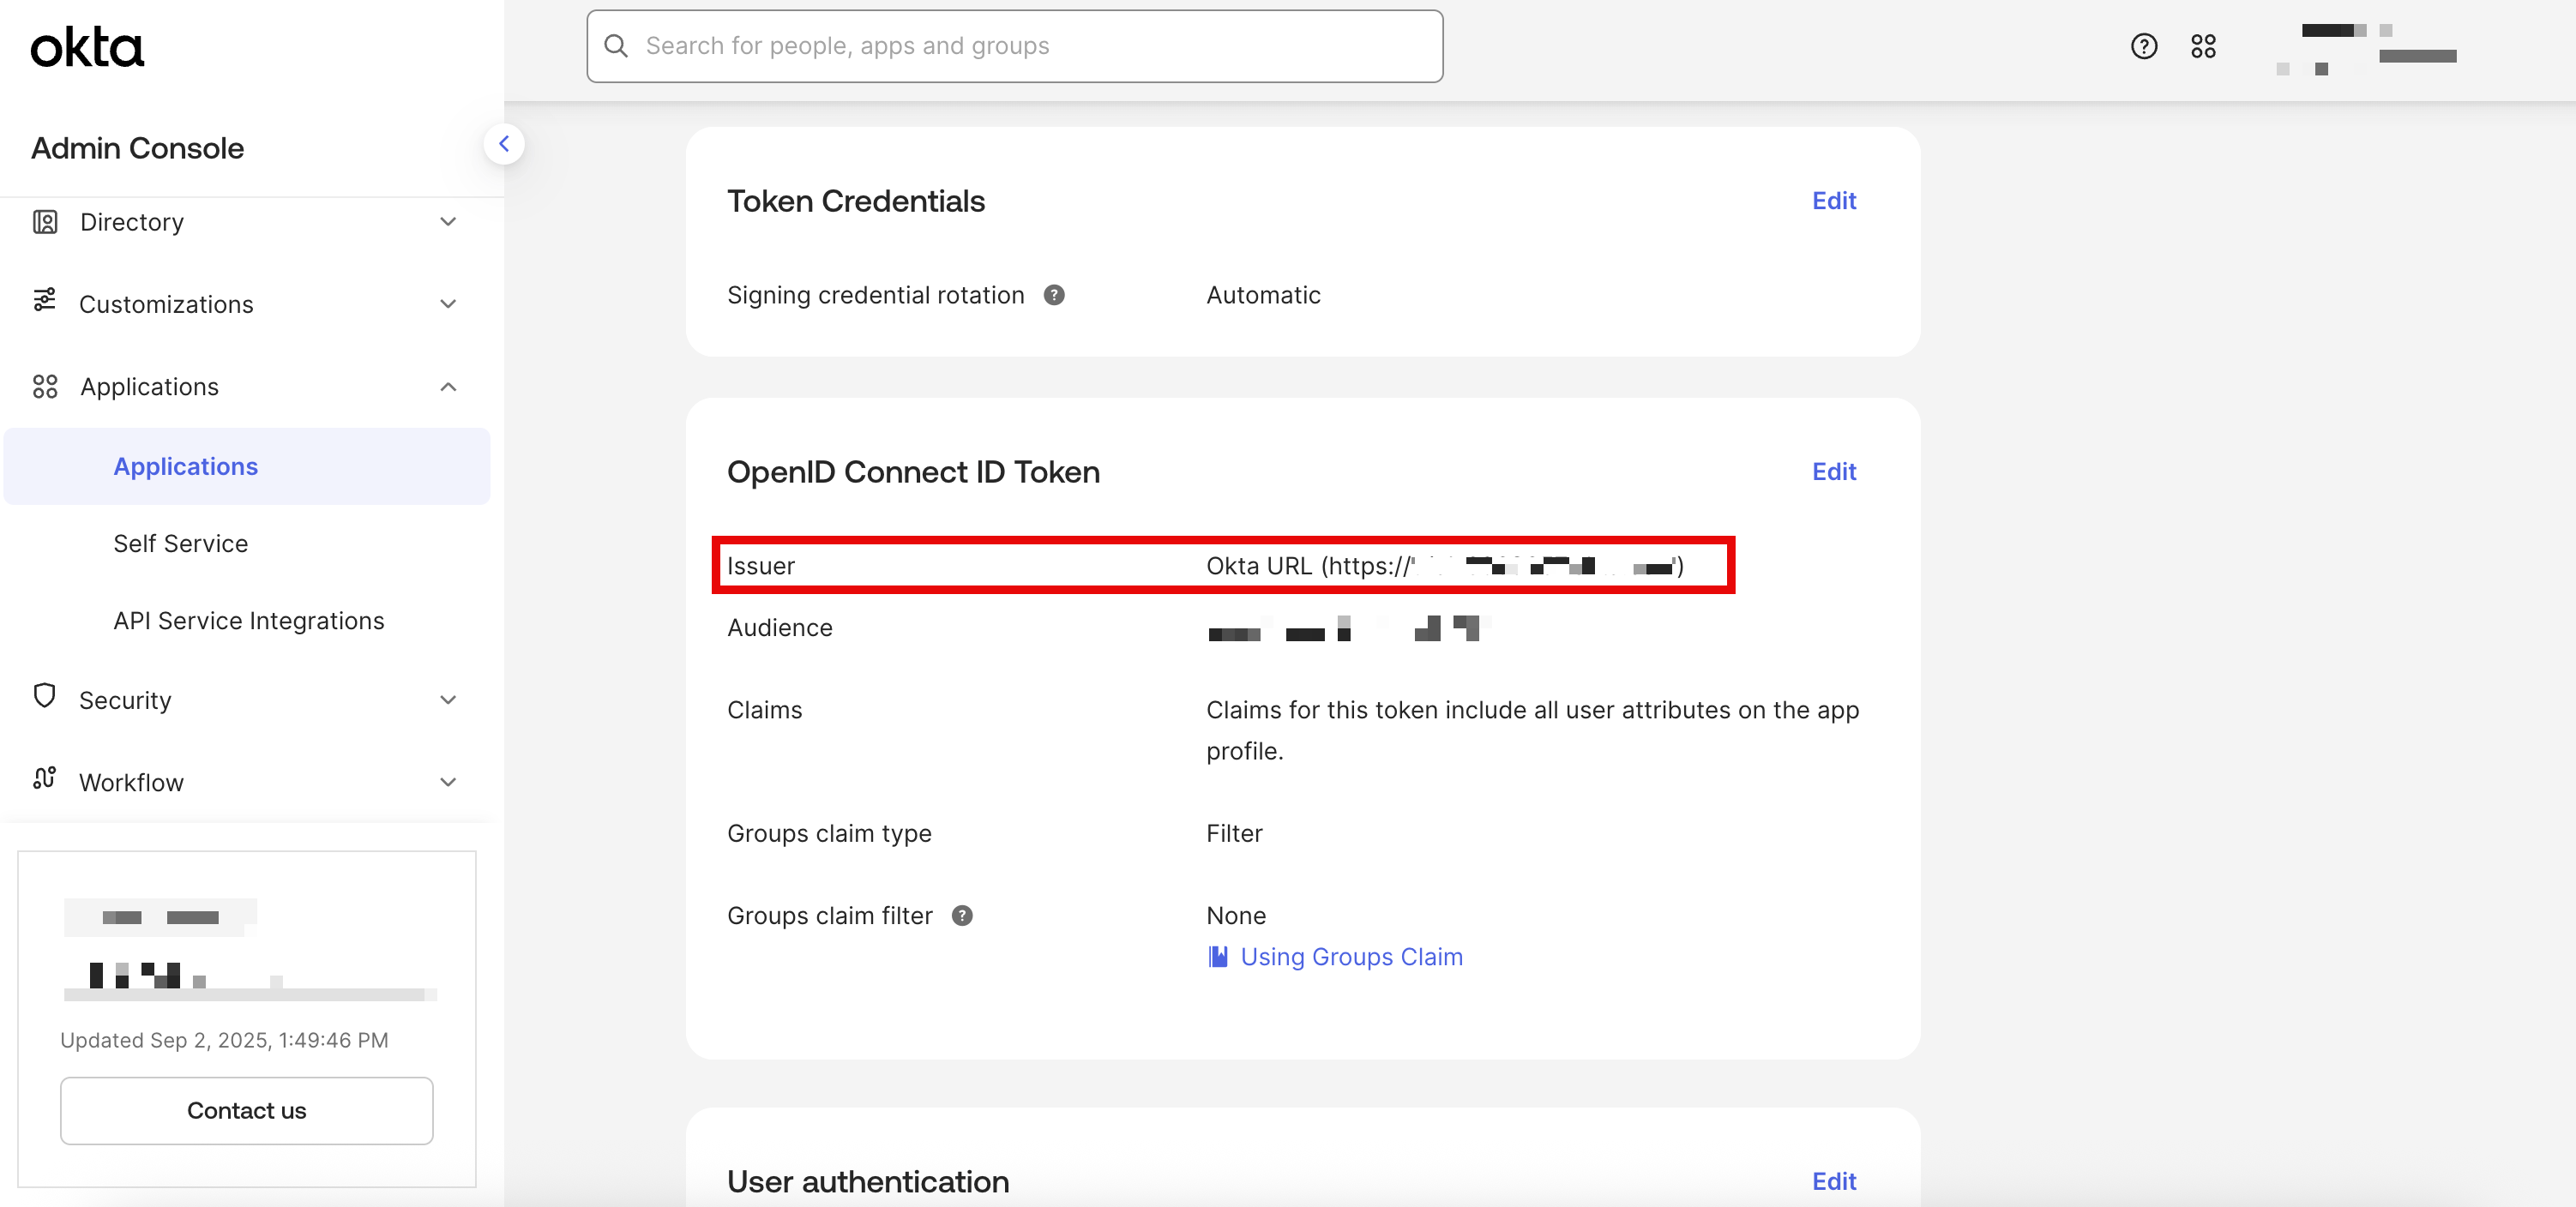
Sign Ontab- Note the
Issuer URLunder OpenID Connect ID Token - Ensure the Issuer URL is set to
Okta URL
- Note the
-
You'll use the
Client ID,Client Secret, andIssuer URLyou noted in the next section.
Add OIDC Settings to Sublime
- Log into the Sublime Platform
- Navigate to
Admin > Account - Under
Authentication, click the button next toOpen ID Connect - Enter your
OIDC Issuer URL,Client ID, andClient Secret
- Click the
Savebutton
Test OIDC Configuration
You should now be able to sign into Sublime via Okta. You can verify the integration is working by either selecting the Sublime Platform application in Okta, or by loading the Initiate login URL from your OIDC settings in Sublime.
Matching User RequiredFor a user to successfully sign into Sublime with your OIDC identity provider, there must already be a matching user with the same email address in Sublime.
(Optional) Configure SCIM for automated user lifecycle management
Sublime's SCIM API allows you to provision, update, and de-provision Sublime users from Okta, including managing each user's Sublime role.
Sublime and identity provider admin requiredTo integrate with SCIM, you'll need to be an administrator for both Sublime and Okta, or get the help of an admin for each.
The following SCIM features are currently supported:
- Create Users
- Update Users
- Deactivate Users
Gather Sublime info
To integrate Okta with SCIM, you'll need the following from the Sublime dashboard:
- The SCIM API base URL for your Sublime instance:
- In Sublime, navigate to the API page
- Copy the Base URL. For example, Sublime Cloud's US region has the API base URL
https://platform.sublime.security - Append
/v0/scimto the base URL to construct a SCIM API base URL likehttps://platform.sublime.security/v0/scim - Hold onto this URL
- An API key for a Sublime admin:
- In Sublime, navigate to the API page
- Click New Key
- Enter a key name, such as "SCIM Integration"
- Click Save
- Copy and hold onto the new key
Add SCIM provisioning to the Okta app
- Go to the overview page for the Okta application you created
- Click the General tab
- In the App Settings section, click Edit
- Check Enable SCIM provisioning
- Click Save
- Click the Provisioning tab that appears
- Click Edit
- For SCIM connector base URL, enter
https://platform.sublime.security/v0/scim - For Unique identifier field for users, enter
userName - For Supported provisioning actions, check:
Import New Users and Profile UpdatesPush New UsersPush Profile Updates
- For Authentication Mode, select HTTP Header
- For Authorization, enter the Sublime API key you created
- Click Test Connector Configuration and confirm you get a Connector configured successfully message
- Close the Test Connector Configuration modal
- Click Save
- Click the To App subtab
- In the Provisioning to App section, click Edit
- Check Enable for:
Create UsersUpdate User AttributesDeactivate Users
- Click Save
- Under Sublime Platform Attribute Mappings, update the mappings as follows. You should only need to remove some of the default mappings.
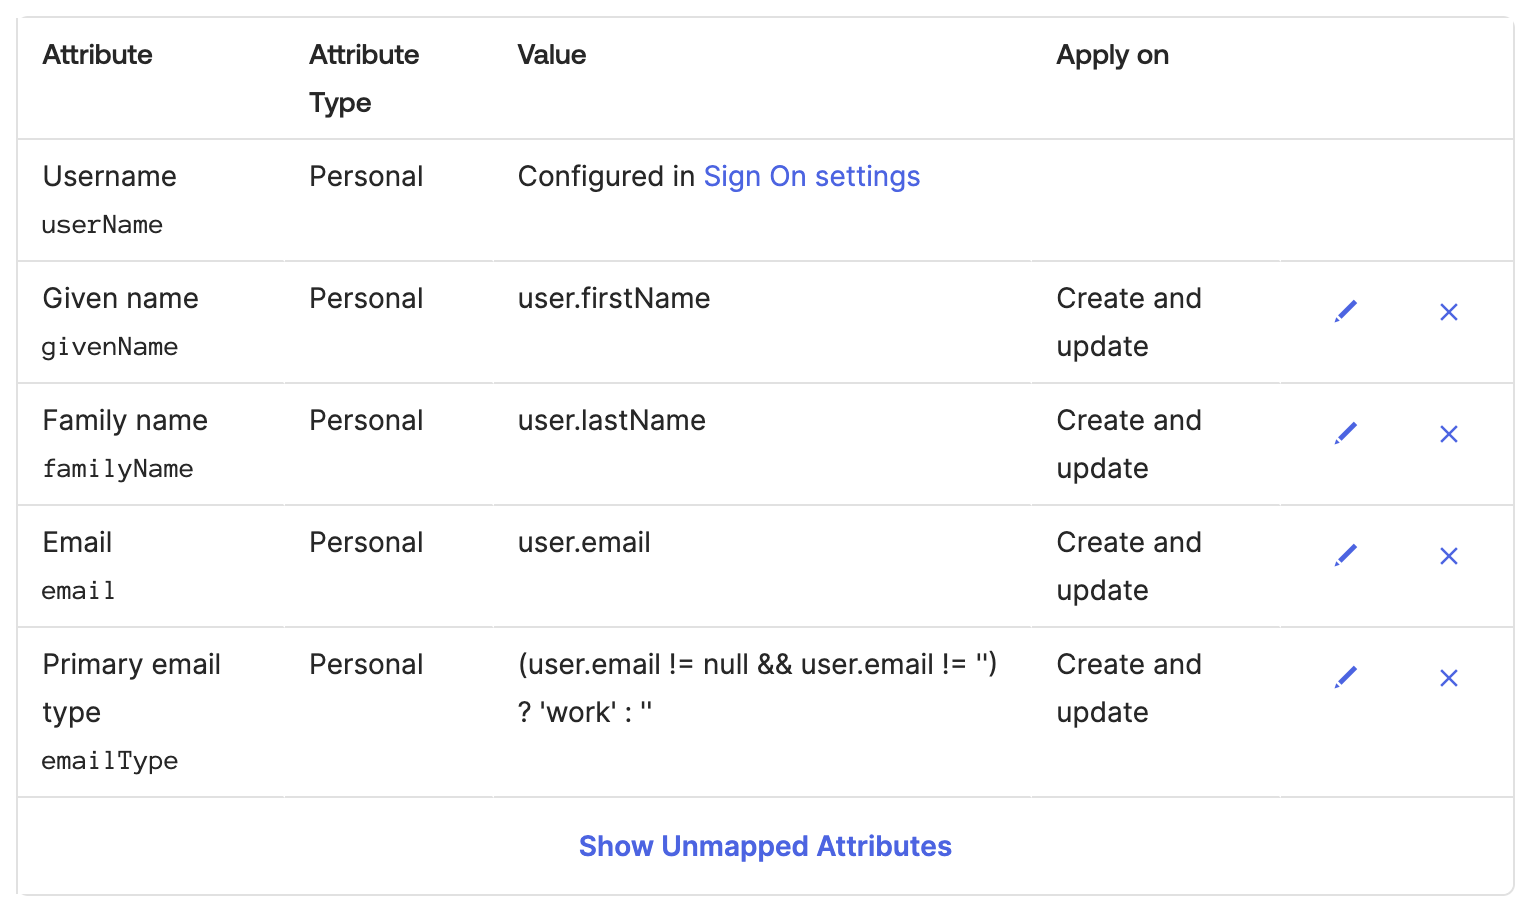
- Leave all other provisioning settings unchanged
Map Okta groups to Sublime roles
- In Okta, go to Directory > Profile Editor
- Under the Users tab, click your Sublime Okta app
- Click Add Attribute
- Add a new attribute with these properties:
- Data type:
string - Display name:
Sublime Role - Variable name:
sublimeRole - External name:
sublimeRole - External namespace:
urn:ietf:params:scim:schemas:core:2.0:User - Enum: checked, with these options:
Admin:adminEngineer:engineerAnalyst:analyst
- Attribute length: between 0 and 50
- Attribute required: unchecked
- Attribute type:
Group
- Data type:
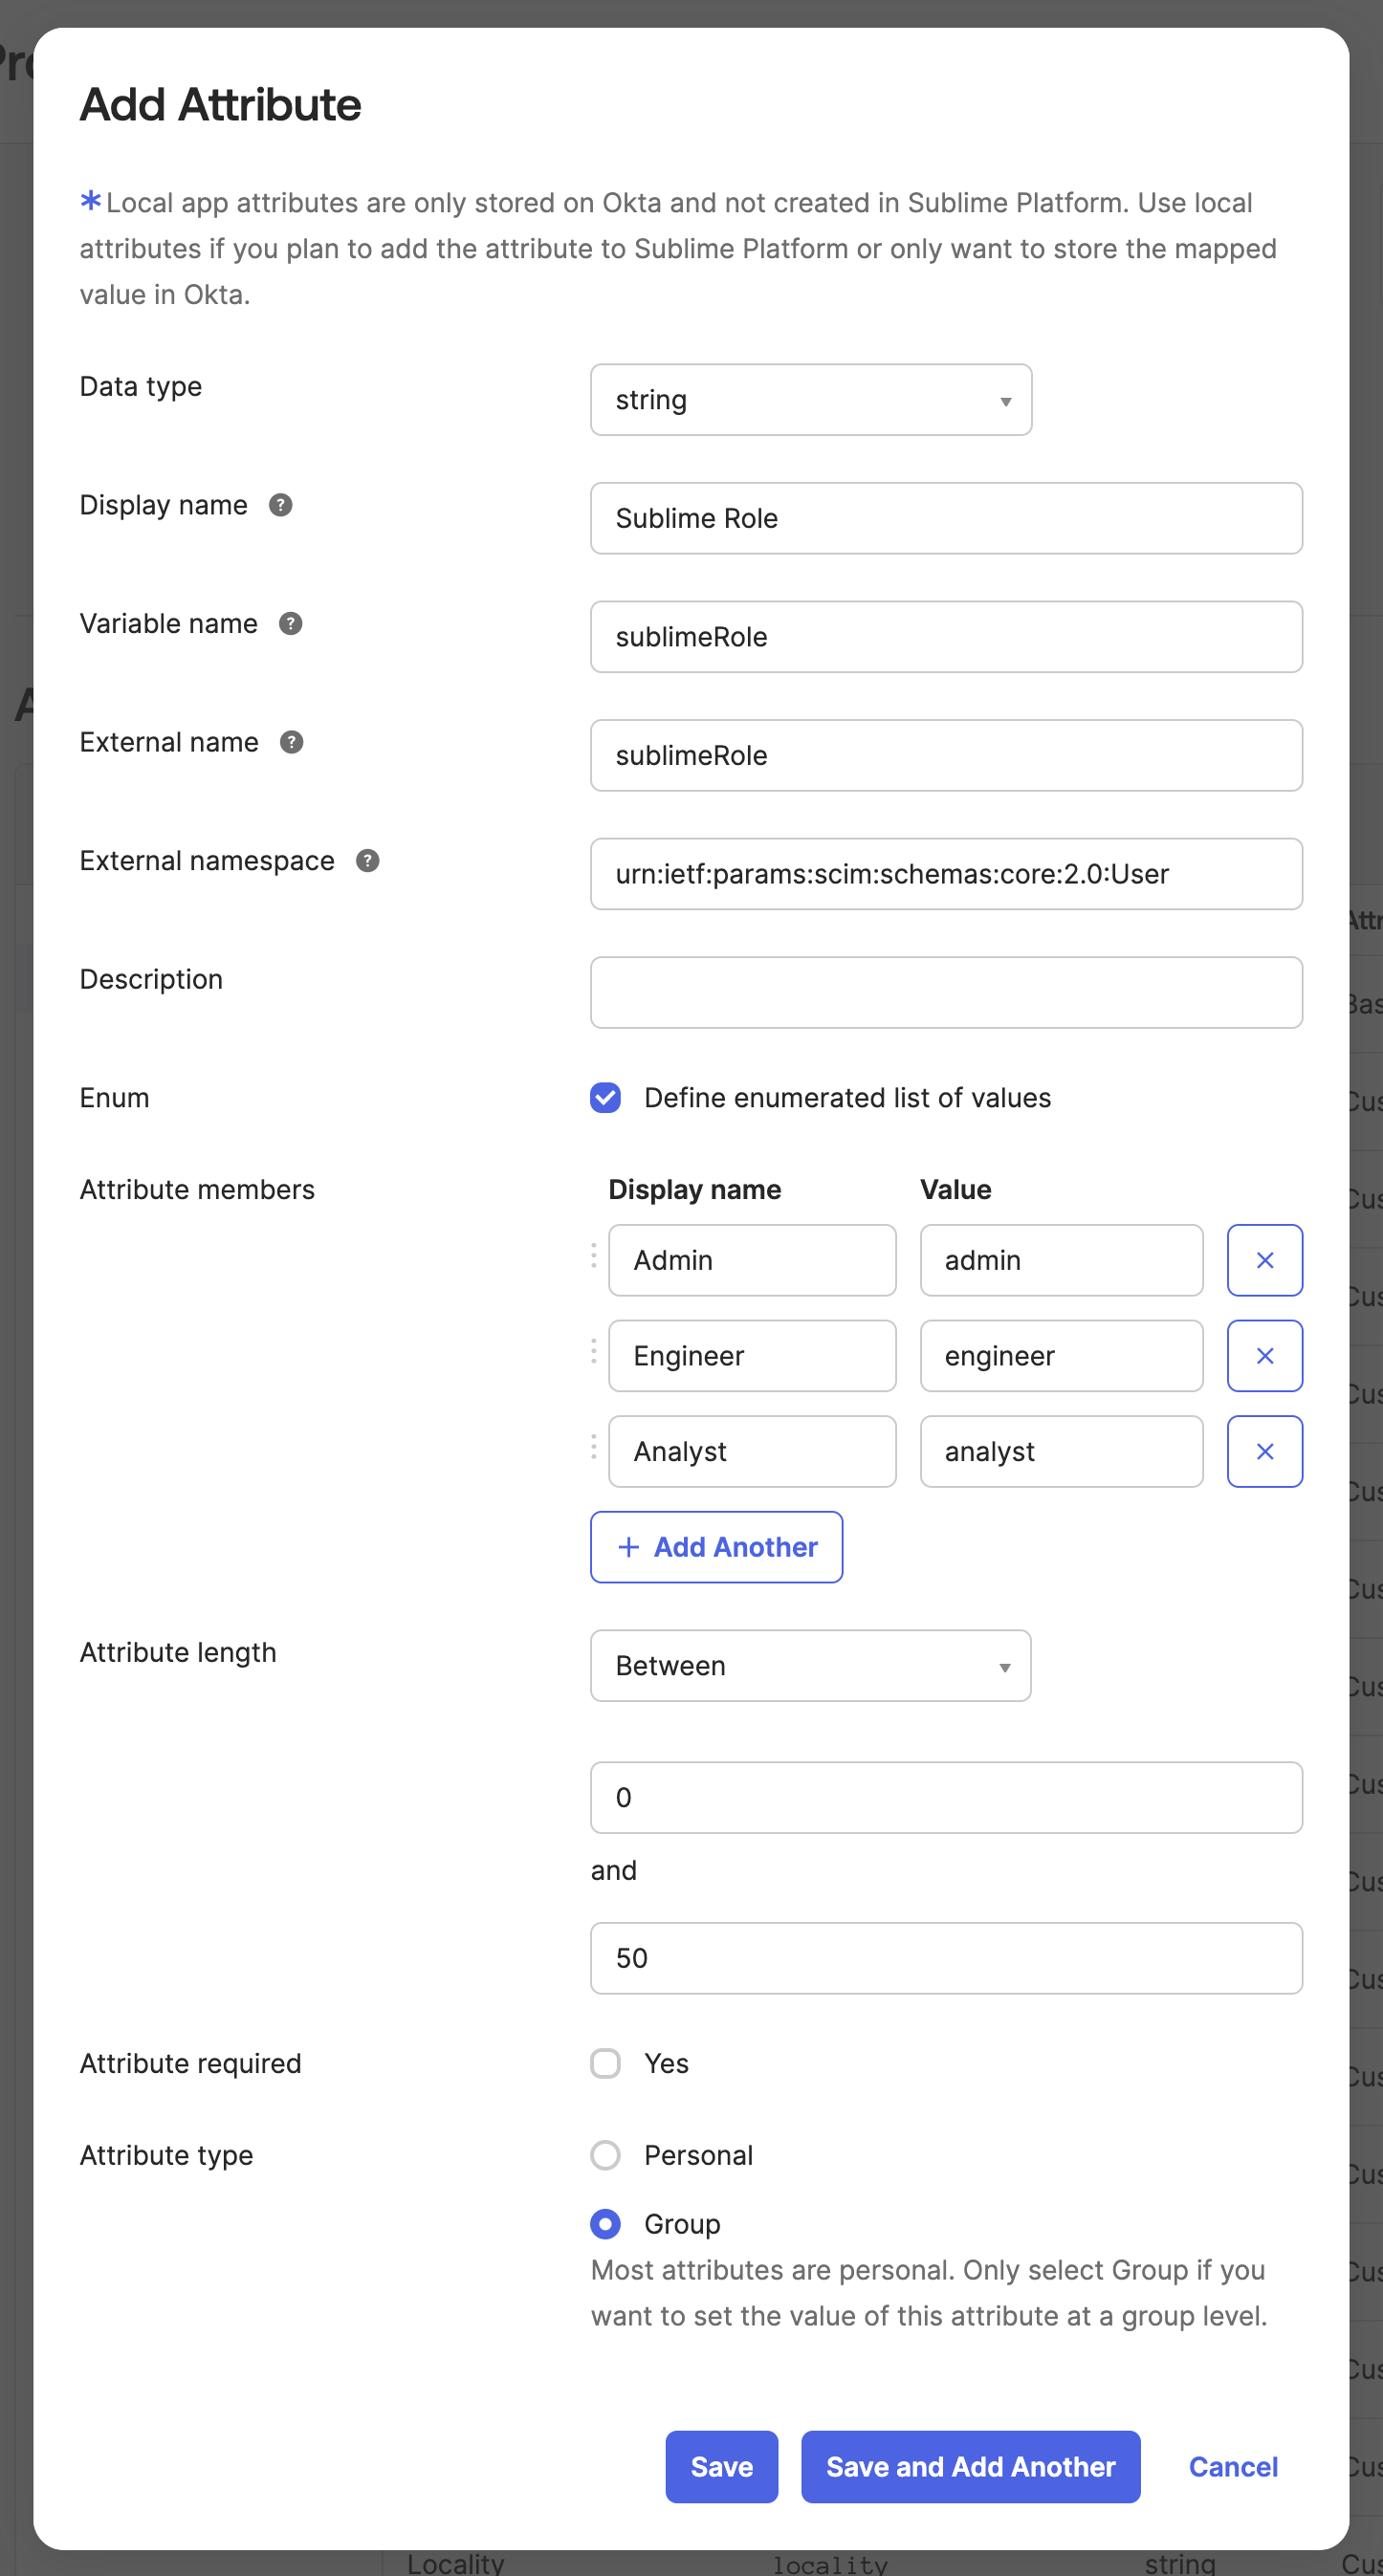
- Click Save
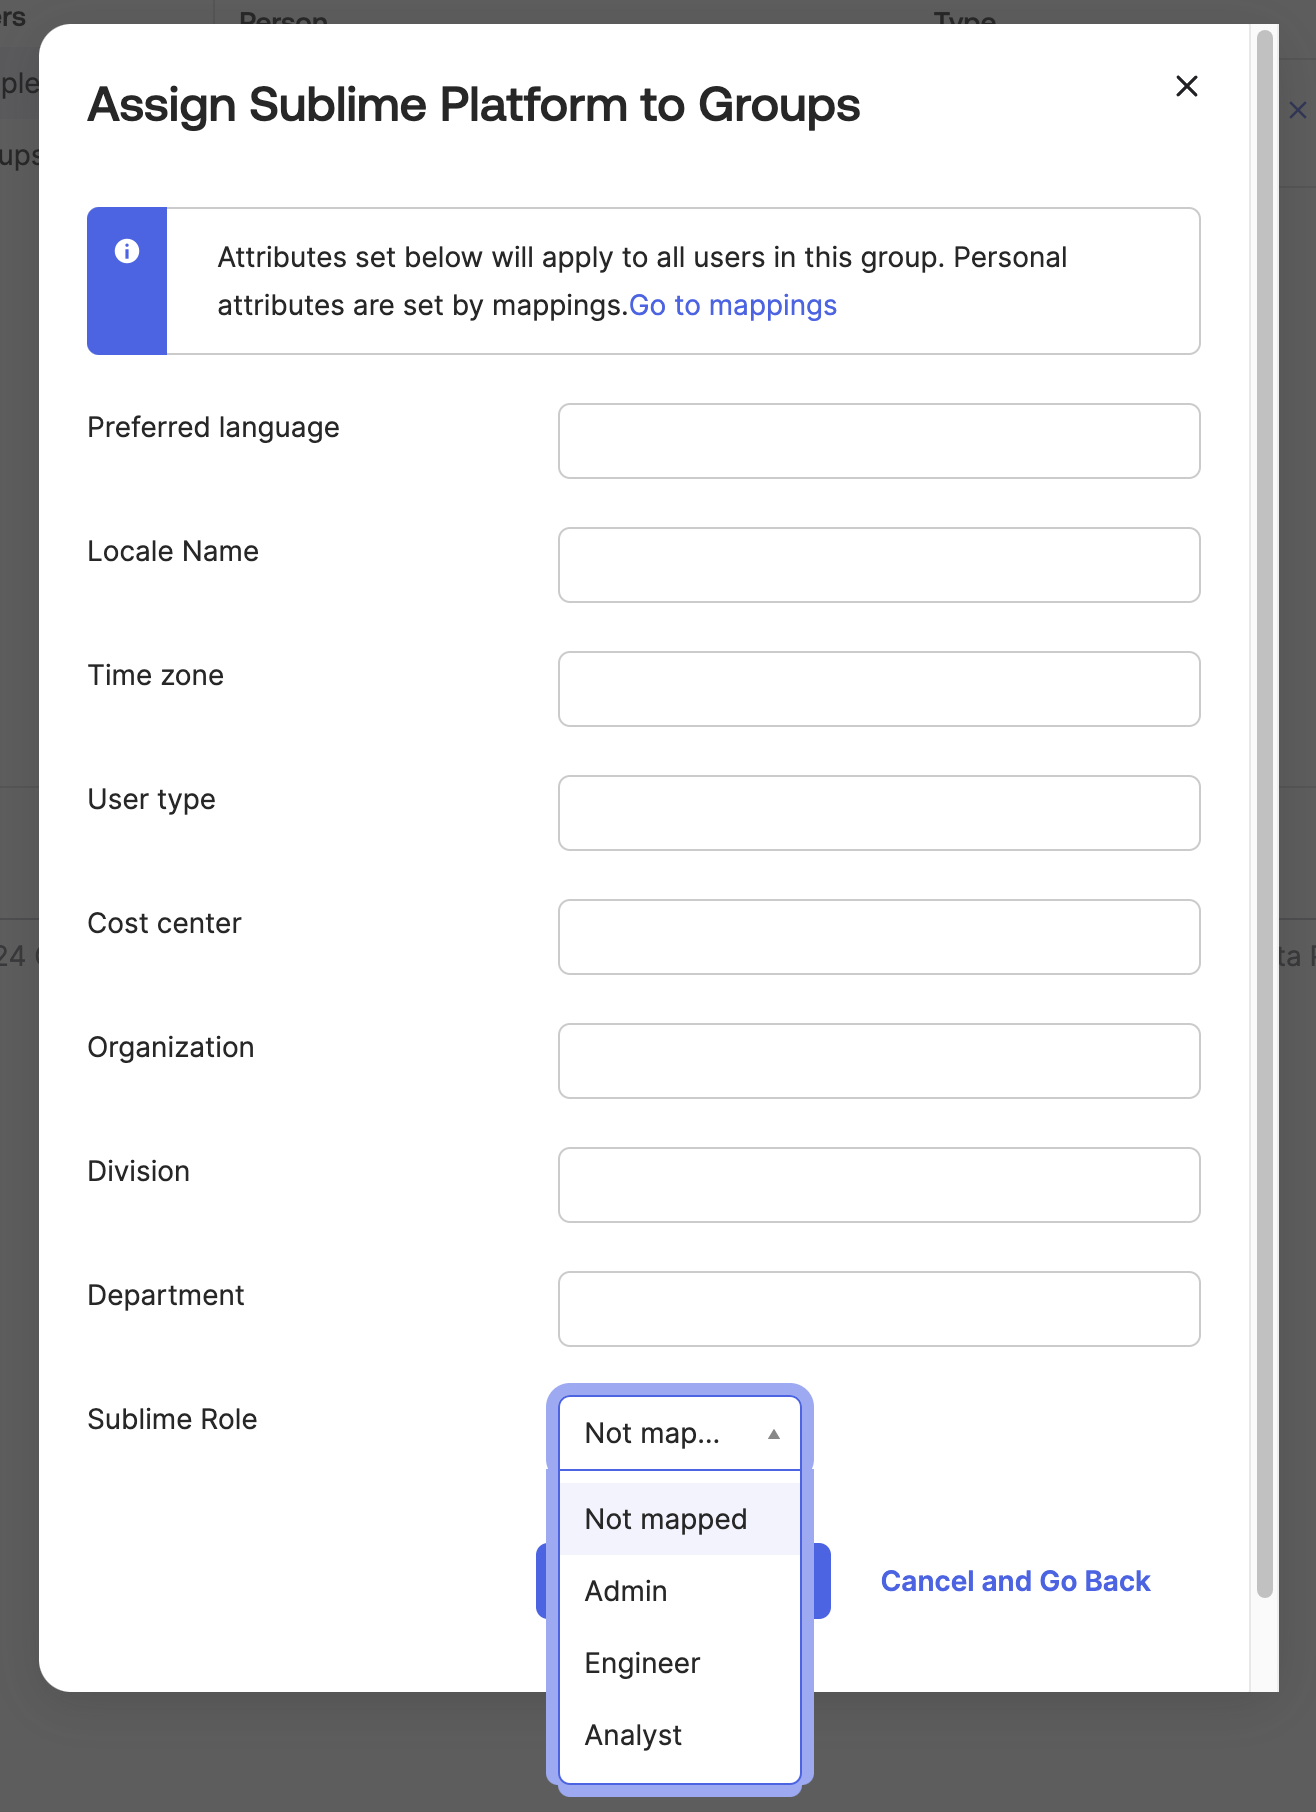
When assigning a group to the Okta app, you can now attach a Sublime role:
Updated 30 days ago