

Google Workspace Inline Settings
Overview
Sublime’s default set up analyzes and remediates messages upon receipt in an end-user’s mailbox (”post-delivery”).
Enterprise users can choose to instead analyze and remediate threats before they land in end-user mailboxes (”pre-delivery”) using our inline protection mode for inbound messages, without losing the ability to complete manual remediations post-delivery.
This page contains instructions for enabling the inline protection mode as well as FAQs.
Phased rolloutRoll out inline protection in phases, so each group of mailboxes runs long enough to review before you widen the scope.
- Test group: start with a small group of test mailboxes and shared aliases. Run inline protection on that group for at least one week.
- 25% increments: add mailboxes in increments of 25% of the mailboxes you plan to cover. Observe each increment for at least three days before you add the next one.
Test mailboxes and shared aliases carry lower business impact than end-user mailboxes, so a delay during the first phase reaches fewer people. Each observation window gives you time to review the delay and failure alerts your Sublime team sets up during enablement.
Prerequisites
- You must have access to Google Workspace Admin settings to add Compliance Rules, SMTP Relays, and Inbound Connectors.
- Google Workspace's comprehensive mail storage setting changes what inline protection mode can block for individual mailboxes. Review Comprehensive Mail Storage before you start.
Environment-specific onboarding details
Setting up inline protection mode requires IPs, hostnames, and DNS configurations that are environment-specific. Find your environment-specific details here:
To figure out your base URL, head to
Automate > APIin the platform navigation. Your Base URL is located at the top of the page
| Base URL | Inbound Domain | Outbound Domain | IP #1 | IP #2 |
|---|---|---|---|---|
platform.sublime.security | smtp.platform.sublimesecurity.com | outbound.platform.sublimesecurity.com | 34.197.67.5 | 44.194.118.42 |
na-east-2.platform.sublime.security | smtp.na-east-2.platform.sublime.security | outbound.na-east-2.platform.sublime.security | 3.132.96.216 | 3.21.140.176 |
na-east-3.platform.sublime.security | smtp.na-east-3.platform.sublime.security | outbound.na-east-3.platform.sublime.security | 52.23.100.46 | 98.85.180.179 |
na-east-4.platform.sublime.security | smtp.na-east-4.platform.sublime.security | outbound.na-east-4.platform.sublime.security | 3.12.26.111 | 3.139.51.102 |
na-east-5.platform.sublime.security | smtp.na-east-5.platform.sublime.security | outbound.na-east-5.platform.sublime.security | 44.206.61.73 | 54.147.174.53 |
na-west.platform.sublime.security | smtp.na-west.platform.sublime.security | outbound.na-west.platform.sublime.security | 44.235.83.149 | 44.244.87.130 |
na-west-2.platform.sublime.security | smtp.na-west-2.platform.sublime.security | outbound.na-west-2.platform.sublime.security | 35.83.24.249 | 44.237.60.158 |
na-west-3.platform.sublime.security | smtp.na-west-3.platform.sublime.security | outbound.na-west-3.platform.sublime.security | 32.185.9.171 | 52.24.157.229 |
uk.platform.sublime.security | smtp.uk.platform.sublime.security | outbound.uk.platform.sublime.security | 13.42.109.233 | 18.135.235.114 |
eu.platform.sublime.security | smtp.eu.platform.sublime.security | outbound.eu.platform.sublime.security | 52.214.238.48 | 54.247.166.54 |
au.platform.sublime.security | smtp.au.platform.sublime.security | outbound.au.platform.sublime.security | 13.238.69.11 | 54.252.178.93 |
ca.platform.sublime.security | smtp.ca.platform.sublime.security | outbound.ca.platform.sublime.security | 15.157.18.163 | 3.97.76.222 |
Instructions
1. Update SPF Records
In order to ensure reliable delivery, you must update your domain's SPF (Sender Policy Framework) record to include Sublime's IP addresses. This ensures that messages sent by Sublime on your behalf are properly authenticated.
- Access your DNS management interface (wherever your domain's DNS records are managed)
- Locate your SPF record (typically a TXT record for your domain)
- Add Sublime's IP addresses to the SPF record using the
ip4:mechanism
Example SPF record (add to your existing SPF record):
v=spf1 ... ip4:34.197.67.5 ip4:44.194.118.42 ~all
Replace the IP addresses with those from your region. If you already have an SPF record, add the IP addresses to it rather than creating a new record.
- Save the DNS changes
- Wait for DNS propagation (typically 15 minutes to 48 hours)
2. Add Gmail Host Route
Configure Google Workspace to route messages to Sublime's SMTP server.
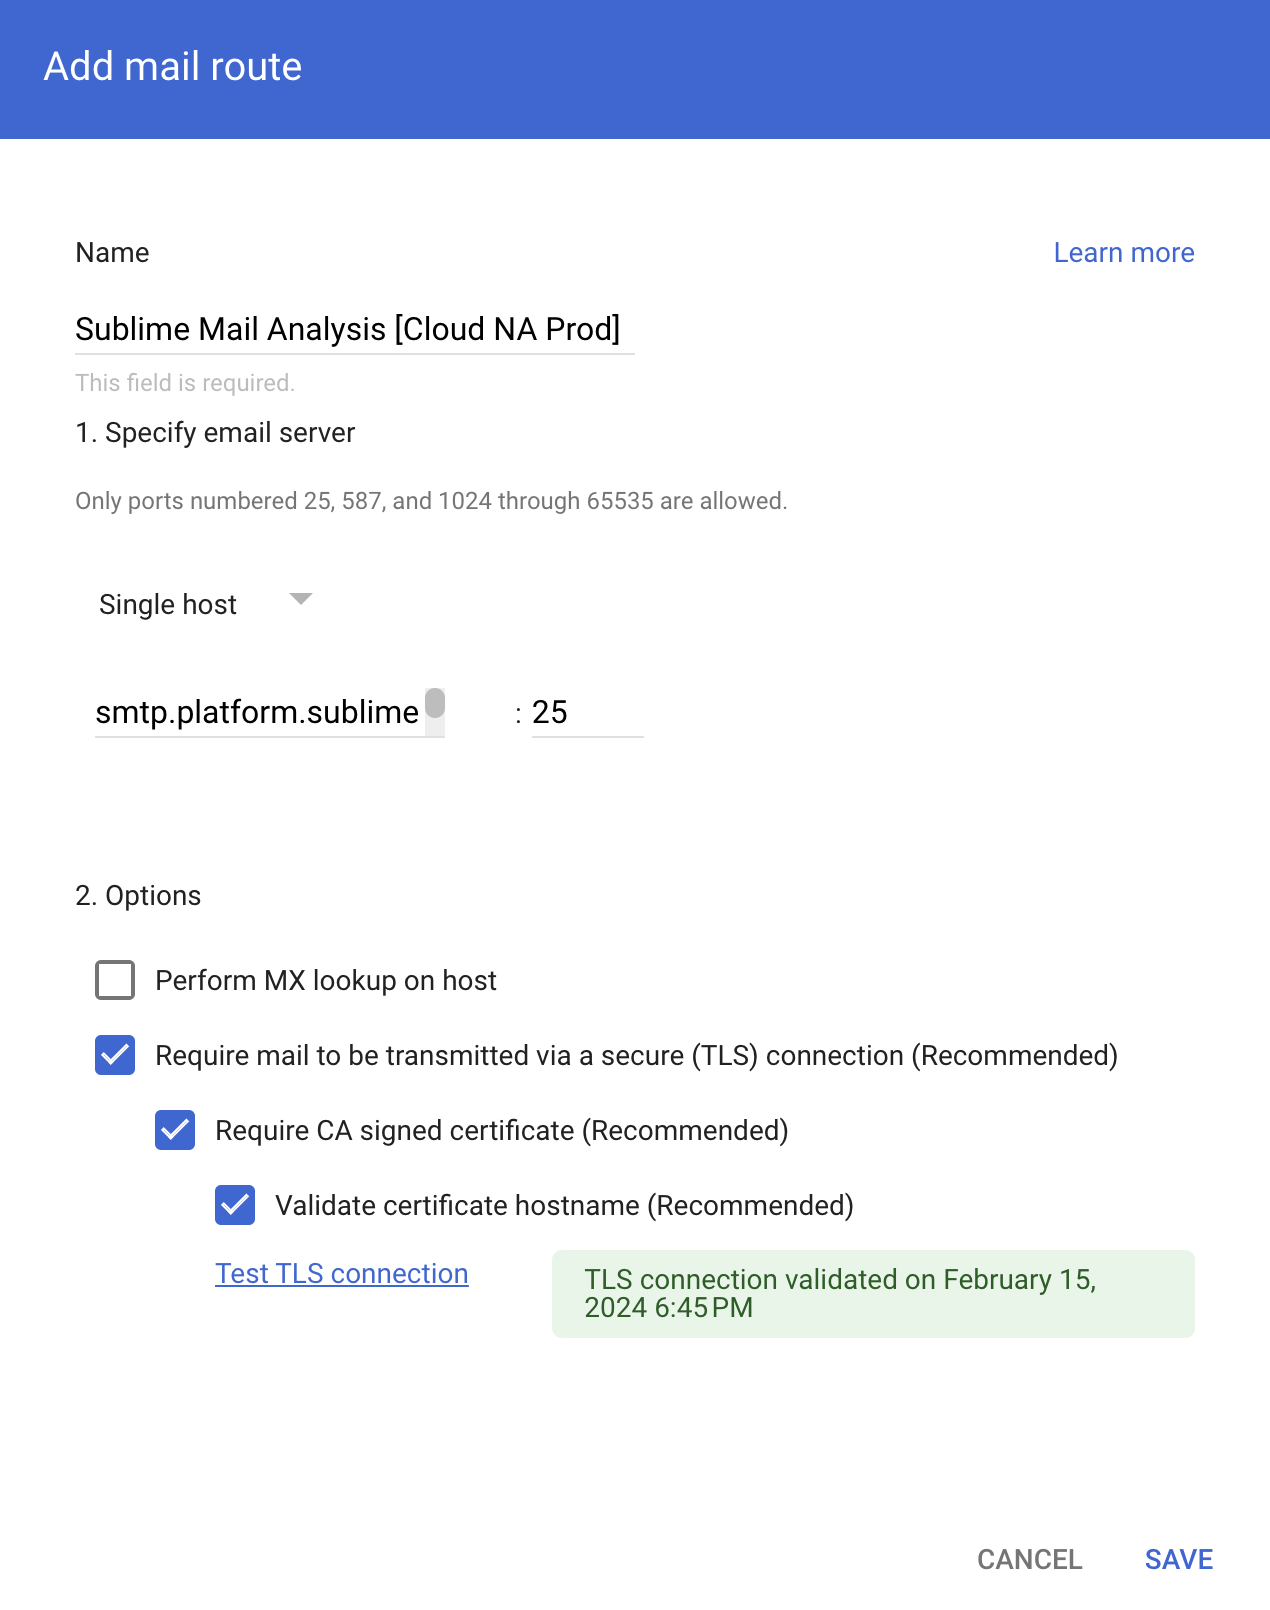
- Go to Gmail Hosts setting in Google Admin Console.
- Click
Add routeorHosts > Add route. - Configure the route:
- Name:
Sublime Platform: Inbound inline(or any route name you'd like!) - Specify email server: Select "Single host".
- For the Single Host value, refer to the Environment-specific onboarding details table (top of this page). Find the row for your Sublime environment's Base URL and enter the value from the column named Inbound Domain
- For the Single Host port, use
25
- Specify options:
- ✅ Require mail to be transmitted via a secure (TLS) connection
- ✅ Require CA signed certificate
- ✅ Validate certificate hostname
- Name:
- Confirm your settings are valid by clicking the hyperlink for
Test TLS connection - Click
SaveorAdd
Example Host Route:
3. Get your Authentication Header Value
Only an
Adminon your Sublime account can complete this step.
You'll need a signed header value from Sublime to authenticate messages. This value is unique to your message source.
-
Log in to the Sublime dashboard.
-
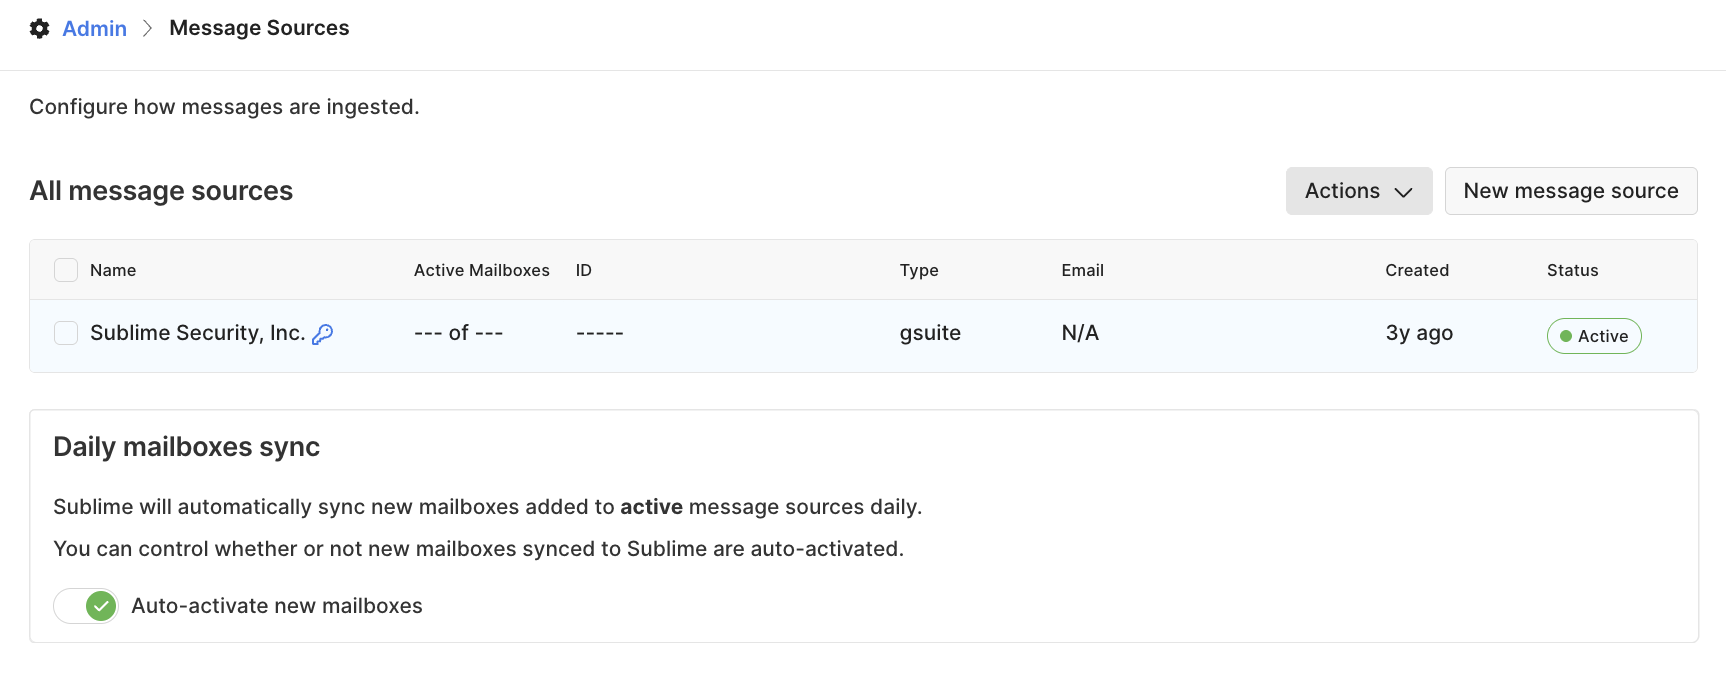
Navigate to Admin > Message Sources.
-
Find the message source you're connecting and click the key icon (🔑) next to it.
-
Click the code block to copy the
X-Sublime-Inline-Message-Metaheader value (you'll use a different name for this header below). -
Save this value - you'll need it in the next step.
⚠️ Security Note: Treat this header value as a secret. It authenticates messages from your organization.
4. Create Compliance Rule
The compliance rule tells Google Workspace to route messages to Sublime for processing.
-
Go to Gmail Compliance settings in Google Admin Console.
-
Under Content Compliance, click Configure.
-
In the Add setting dialog, configure the rule:
-
Description:
Sublime inboundor some description of your choice -
For section 1. Email messages to affect: tick boxes for one or both of:
- Inbound
- Internal - Receiving
-
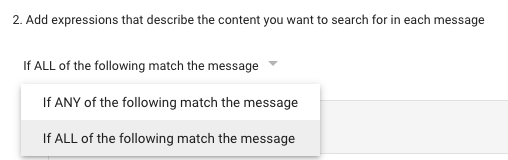
For section 2. Add expressions that describe the content you want to search for in each message: Adjust the dropdown for the expression from the default value of ANY to select
if ALL of the following match the message
-
Just below section 2, click the Add button
- In the Add setting dialog:
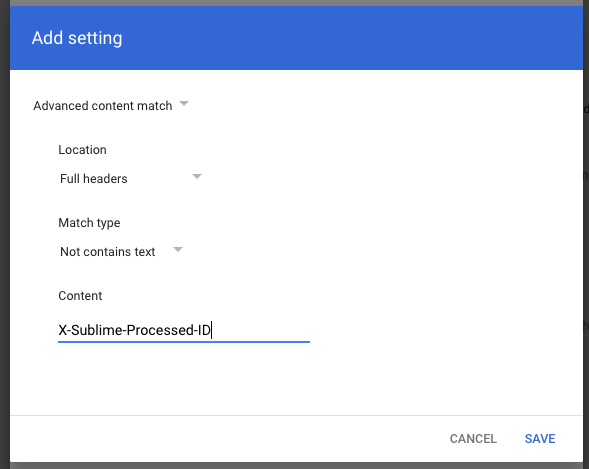
- Change the drop down to
Advanced Content Match - Location:
Full Headers - Match type:
Not contains text - Content:
X-Sublime-Processed-ID
Example:
- Change the drop down to
- In the Add setting dialog:
-
For section 3. If the above expressions match, do the following:
- Leave the dropdown at the default value of Modify message:
- Tick the box for Add X-Gm-Original-To header
- Tick the box for Add X-Gm-Spam and X-Gm-Phishy headers
- Tick the box for Add custom headers click the Add button and configure these values:
- Header name:
X-Sublime-Receiving- Note: the
X-is already present, just typeSublime-Receiving
- Note: the
- Header value: Paste the value of the Authentication Header secret you collected in Step 3
- Header name:
- Leave the dropdown at the default value of Modify message:
-
Subject can be left as default (unchecked)
-
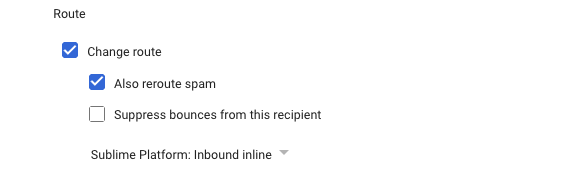
Route:
-
Tick the box for Change route:
- Tick the box for Also reroute spam
- In the Dropdown with default value Normal Routing, Select the host route you created in Step 1 (e.g., "Sublime Platform").
-
-
Skip to the bottom of the dialog box and click Show Options to present more options
-
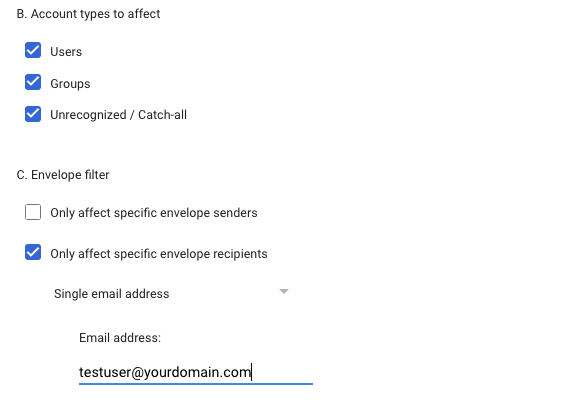
Find the setting forAccount types to affect:
- Tick the box for Users
- Tick the box for Groups
- Tick the box for Unrecognized / Catch-all
-
Find the setting section for Envelope Filter
- These control the application of the Compliance Rule settings to a specific sender or recipient.
- It's highly recommended to check this box and apply to a single test user recipient initially. Also note that, when you save this rule, it will take effect within a few seconds, so it's best to not apply this to the entire organization until you're ready.
- Example of a test configuration for a single recipient:
-
-
Click Save in the Add setting dialog box to save the compliance rule. Note it will take effect immediately.
Important: The compliance rule must:
- Apply to inbound and/or internal messages as needed
- Not apply when
X-Sublime-Processed-IDheader is present (to avoid loops) - Set the
X-Sublime-Receivingheader with your authentication value - Route messages to the host you created in Step 1
5. Create inbound gateway
Configure the inbound gateway to trust messages coming back from Sublime.
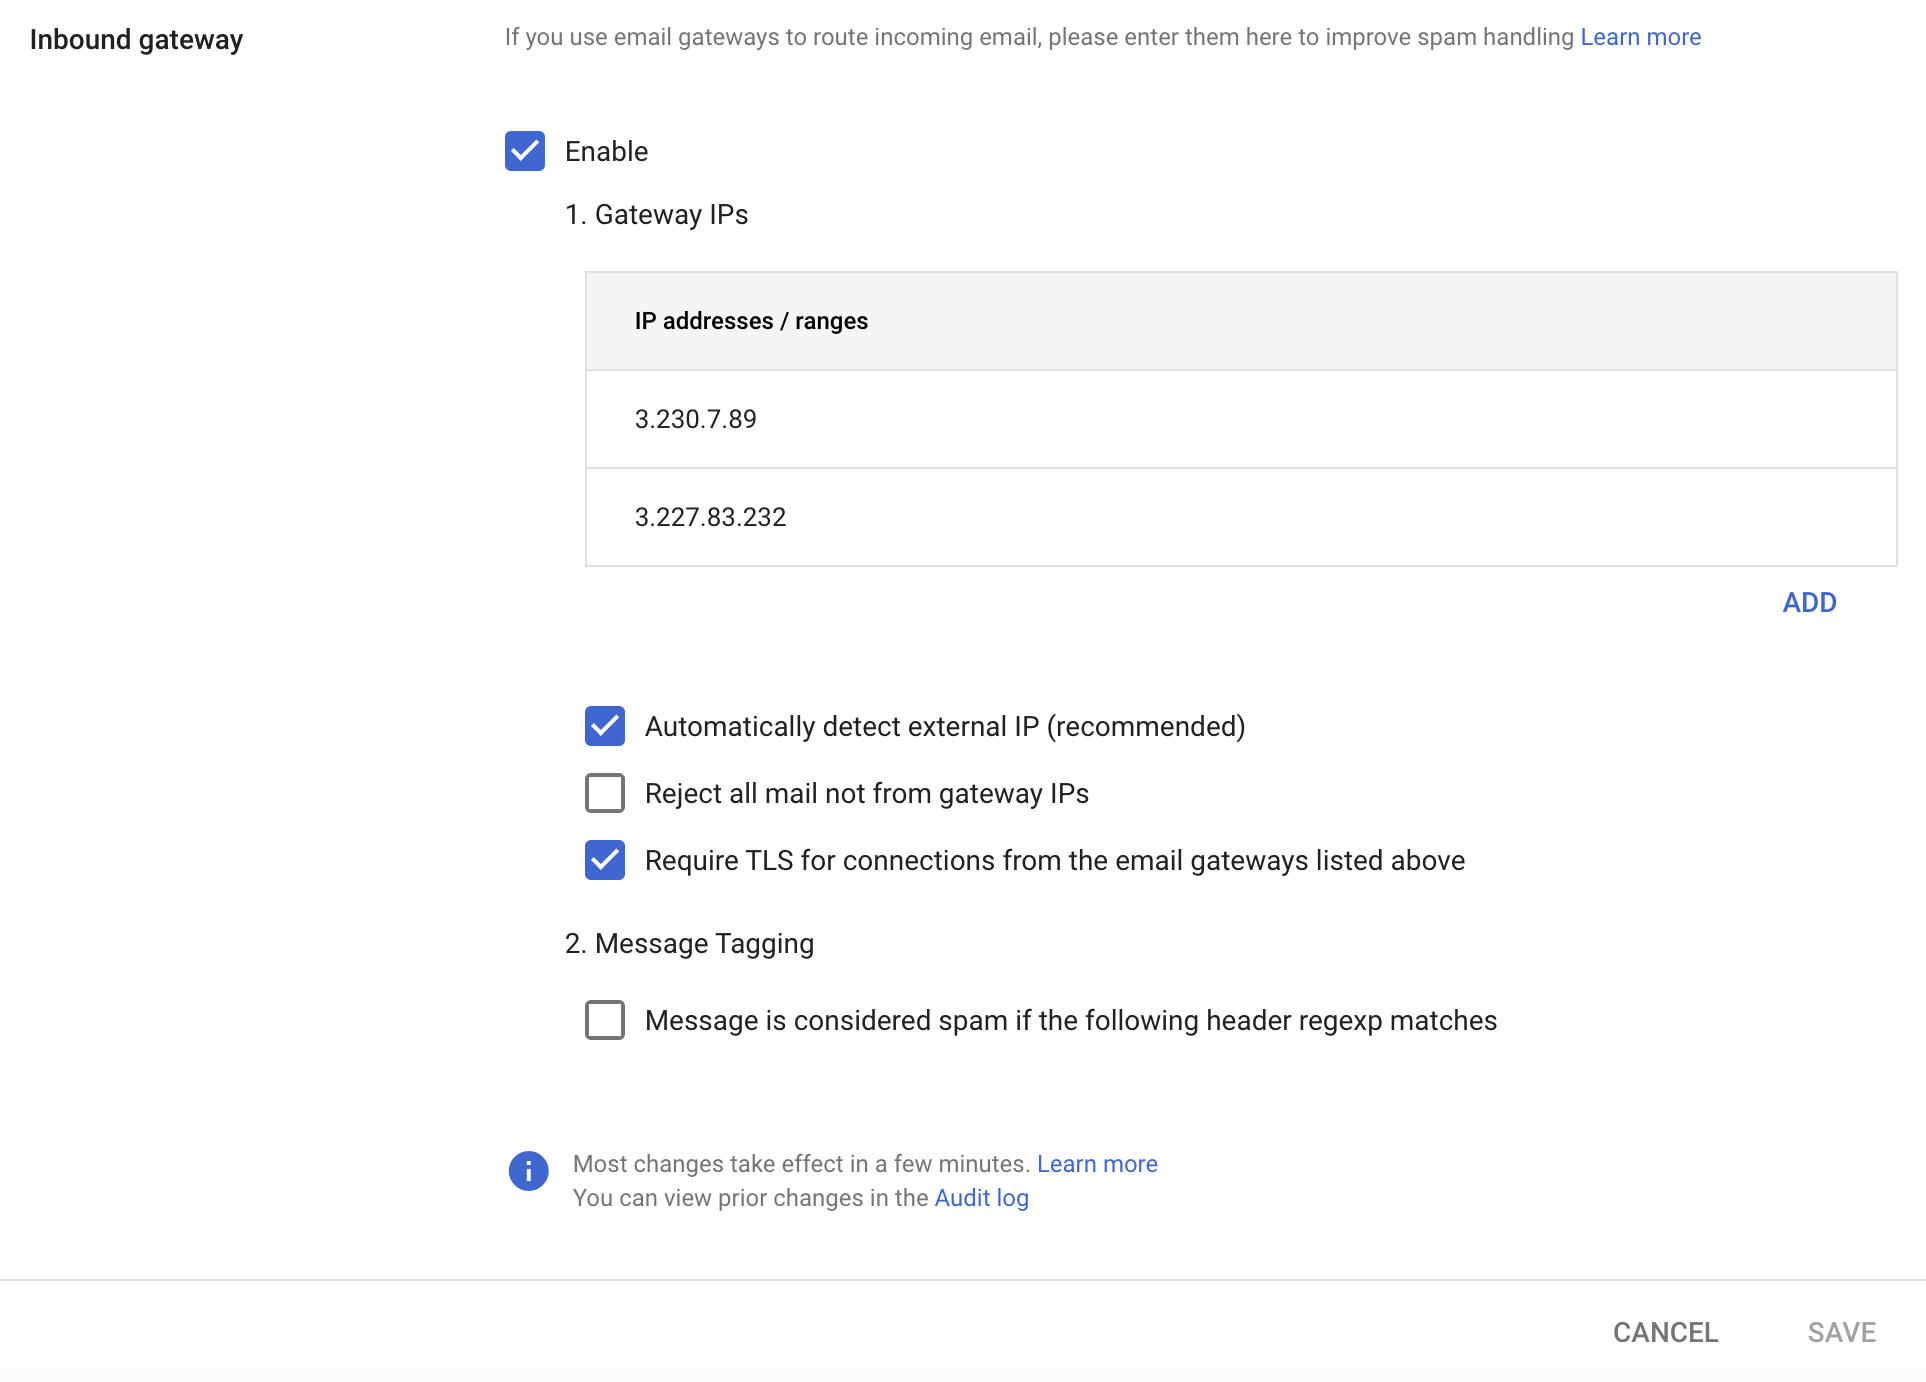
- Go to Gmail Spam, phishing, and malware settings in Google Admin Console.
- Scroll to the Inbound Gateway section
- Click
Edit(orEnableif not already enabled) - Configure Gateway IPs:
- Add both of the IP Addresses from Environment-specific onboarding details table (top of this page). Find the row for your Sublime environment's Base URL and enter the values from the column named IP #1 and IP #2
- Tick the box for Automatically detect external IP
- Tick the box for Require TLS for connections from the email gateways listed above
- Optional - Configure Message Tagging:
- Under "Message is considered spam if the following header regexp matches"
- Regexp:
X-Sublime-Spam - Message is spam if regexp matches: ✅ Checked
- Click Save
Here's an example inbound gateway without the Sublime regex spam filter enabled:
6. Configure settings in Sublime
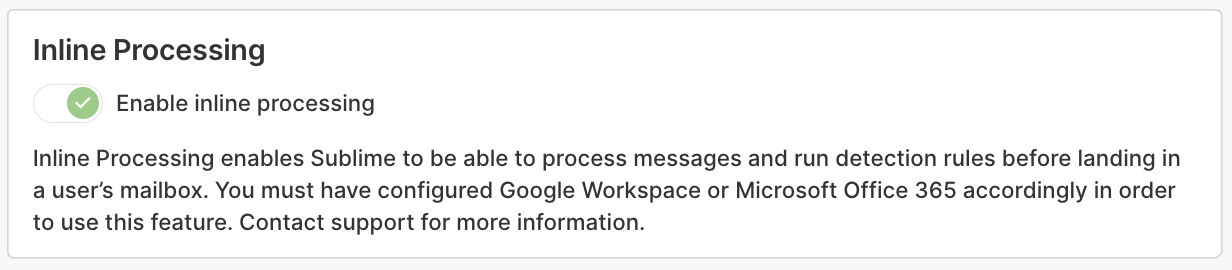
This enables monitoring and metrics collection for your inline protection mode setup.
- Log in to the Sublime dashboard
- Navigate to Admin > Account
- Toggle "Enable Inline Processing" to On
7. Test your setup
After completing setup, verify that Inline Processing is working:
- Send a test email from an external sender (outside your organization) to one of your mailboxes (for inbound) or from one internal mailbox to another (for internal).
- Wait for the message to be delivered.
- Check the recipient's message headers (in Gmail: Open message > Show original, or use Email Log Search in Google Admin).
- Look for a
Receivedheader that referencesSublime SMTP Server- this confirms the message was processed by Sublime. - Check for a
X-Sublime-Processed-IDheader. This header should look similar to:v2/01991000-bc0a-72d5-8dd9-260b8107eb76/019b1371-d057-774a-83e4-4367b54e14a7/H9c73pp3GgNtKTfxxwMaaR7KrjjnfISFlJ/4Q89UtTU=. There should be values in each section separated by a slash. If you see two slashes together, it may indicate a problem with your configuration.
Note: Sublime will remove the X-Sublime-Receiving header before delivering the message to the mailbox, so you won't see it in the final message.
Comprehensive Mail Storage
Google Workspace's comprehensive mail storage setting changes what inline protection mode can block. With comprehensive mail storage enabled:
- A message addressed to an individual user reaches that user's Gmail inbox even
when Sublime blocks it inline. This is a Google Workspace routing behavior
rather than a Sublime limitation. - A message addressed to a Google Group is blocked as expected.
Google lists comprehensive mail storage as incompatible with compliance routing rules that change the recipient. Google recommends the setting for organizations that use Google Vault. Read "Considerations before you enable comprehensive mail storage" in Google's documentation before you enable both.
To block messages to individual mailboxes inline, turn comprehensive mail storage off for the users your compliance rule covers. Inline protection mode scoped to Google Groups works with comprehensive mail storage enabled.
Use Email Log Search in Google Admin to confirm which rules matched a test message and where Google delivered it.
Email forwarding behavior
- Quarantined emails: Will not be forwarded (as expected - they're quarantined)
- Spammed emails: Will be forwarded. If you want to prevent this, configure forwarding at the Inbox level or create additional compliance rules
Spam Tagging
The inbound gateway is optionally configured to mark messages as spam if they contain the X-Sublime-Spam header (applied when a Sublime Move to Spam Action runs). This allows you to send messages to spam/junk after delivery if Sublime identifies the message as spam.
You can ensure these messages are routed directly to spam by creating a routing rule that applies when you see the X-Sublime-Spam header.
Spam False Positives
Adding an SMTP relay (Sublime) can increase the likelihood of legitimate messages being marked as spam, especially with strict SPF checks.
Mitigation Steps:
- Ensure you've configured an inbound gateway (Google Workspace) in your email provider to trust Sublime's IP addresses
- Ensure you've added an SPF record for Sublime to your domain's DNS
- Monitor spam folders for false positives and adjust rules as needed
- Another option is to turn off spam filtering at your provider and let Sublime handle spam detection (custom Detection Rules for spam identification would be required)
Automatic Failovers
Unlike Microsoft 365, Google Workspace does not support automatic failover. If Sublime's service becomes unavailable:
- Google Workspace will retry delivery for up to 7 days
- After 7 days, messages are returned to sender as undeliverable
- Manual intervention is required to disable compliance rules if needed
It is recommended that you setup a webhook notification and route the alert to your Google Workspace admin so they can disable inline protection mode.
Disabling Inline Protection Mode
If you need to temporarily or permanently disable inline protection mode for any reason:
- Navigate to Gmail Compliance settings in Google Admin Console
- Find the compliance rule you created for Inline Processing
- Disable or delete the rule
Messages will stop being redirected to Sublime within a few seconds. You can re-enable it at any time by re-enabling the compliance rule.
Note: Disabling the Inline Processing setting at Admin > Account within the Sublime platform does not disable inline protection mode processing. You have to disable or delete the rule in your Google Admin Console.
Reliability and Monitoring
Automatic Monitoring
When Inline Processing is enabled in Sublime Admin, metrics are collected every minute and evaluated for health. If the system is determined to be unhealthy, high-visibility alerts are sent.
Webhook notification
To receive a webhook alert when the Sublime system is unhealthy, configure your webhook by navigating to Admin > Account > Inline Processing and clicking the "Inline Alert Webhook Configuration" button. Alerts will be sent to the endpoint URL you provide. Retrieve the "Webhook secret" your endpoint will use to validate the alert signature (see below). You can optionally specify custom headers to be included in the notification.
If the Sublime system detects inline is in an unhealthy state, it will send and alert with this payload where "unhealthy_metrics" lists which of Sublimes metrics triggered the alert. Note: the exact metric names in this list may vary over time:
{
  "notification_type": "unhealthy_metrics",
    "notification": {
      "org_id": "12345678-1234-1234-1234-123456789abc",
      "message_source_id": "def01234-def0-def0-def0-def01234def0"
      "unhealthy_metrics": ["inline_heartbeat"]
    }
}
The metrics that can appear in unhealthy_metrics are described below. Metric names can change over time, so use this table to interpret alerts rather than as a stable contract for automation.
| Metric | What it measures | What an alert indicates |
|---|---|---|
inline_heartbeat | Health probe for the inline processing pipeline. | Sublime's inline health checks stopped reporting. |
inline_nugget_heartbeat | Health probe for the Sublime SMTP relay (Nugget). | The relay is emitting no data, which points to it being down or unreachable. |
inline_smtp_failures | SMTP-level failures recorded at the relay. | The relay is recording SMTP failures. |
inline_smtp_receive_to_delivery_ms | Time from receiving a message to delivering it onward. | Mail is flowing, but too many messages are slow to deliver, measured at three levels: more than half over 2 minutes, more than 5% over 5 minutes, or more than 1% over 5 minutes. |
inline_delivery_failures | Failures delivering analyzed mail onward to your provider. | Sublime received the mail but recorded failures delivering it onward. |
inline_processing_failures | Failures during Sublime's inline analysis of a message. | Sublime recorded errors analyzing one or more messages. |
Heartbeat metrics (inline_heartbeat, inline_nugget_heartbeat) point to a component that is down or unreachable. The other metrics point to a relay that is running but failing to receive, deliver or analyze mail.
If the system is unable to evaluate the inline health metrics, the Sublime platform will assume there is an outage and an alert will be sent with this payload:
{
  "notification_type": "unable_to_evaluate",
    "notification": {
      "org_id": "12345678-1234-1234-1234-123456789abc",
      "message_source_id": "def01234-def0-def0-def0-def01234def0"
  }
}
The notification will come from Source IPs as described here (link) and your endpoint should respond as described here (link). The payload is signed with the "Webhook secret". Your endpoint should be validate the signature in the same way as described here (link). The signing secret is available on the Webhook configuration page at Admin > Account > Inline Processing and clicking the "Inline Alert Webhook Configuration" button.
After setting up the webhook, test the alert by clicking the "Validate Endpoint" button.
Manual Monitoring
Use Email Log Search in Google Admin to track message delivery
What Happens During an Outage?
If Sublime's SMTP server cannot accept connections (this would be expected to be rare, transient, and quickly resolved):
- Your email provider will retry delivery (up to 7 days)
- After retry period expires, messages are returned to sender as undeliverable
- For Microsoft 365, if monitoring permissions are configured, Sublime can automatically disable the transport rule to "fail open"
- For Google Workspace, messages will eventually be processed once Sublime is available again, but manual disabling of compliance rules may be necessary to prevent delays
Important: Messages are never lost during normal operation. If Sublime successfully receives a message, it is stored and will be processed even if there are temporary processing delays. If, in the worst case, a message fails to be processed after multiple attempts, it is saved with error details for manual recovery.
Updated 9 days ago